Page History
...
Arduino is a project and community wich creates open-source software and open-source hardware. The Arduino boards and software are well suited for novices and expierenced programmers alike to create digital devices. In the following we will see how to develop applications for the Arduino boards using SCCharts together with the Arduino Eclipse Plugin. Several open-source, third-party replacements for the offical Lego firmware have been developed. These support many well known programming languages, such as Java, C/C++, Python, Lua, etc. In the following we will use KIELER SCCharts to program Mindstorms running the Lego Java Operating System (leJOS). Therefore we will first install leJOS NXJ and flash its firmware. Afterwards we will create a simple SCCharts project in KIELER that we will compile and deploy to the NXT brickdownload and setup the development environment and afterwards create and upload a small example project.
...
Download and Configure KIELER
...
Note: Java 1.8 is needed on all operating systems. With Java 1.7 not all plugins of KIELER will be loaded. Furthermore on Windows, you will need to download the 32 Bit version of KIELER – even if you have a 64 bit operating system! Otherwise flashing the brick and uploading to the brick will fail.
The Arduino Eclipse
...
Plugin
There is an Eclipse plugin for leJOS which adds a project creation wizard and launch configuration to the platformArduino, which makes it easy to create and deploy projects and to use the IDE features of the C/C++ Development Tools (CDT) when programming Arduino.
You have to install
...
the
...
plugin manually
...
via Help > Install new Software...
...
. Use the following update site
...
: http:
...
...
...
...
If you have an NXT brick, install the leJOS NXJ Plug-in. If you have an EV3 brick, install the leJOS EV3 plugin.
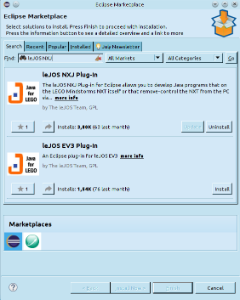
After the installation, the plugin requires a little configuration. Go to Window > Preferences > leJOS NXJ (Window > Preferences > leJOS EV3 respectively) and enter the base directory of your leJOS installation in the NXJ_HOME field.
For EV3, the plugin requires the IP address to connect to the brick (it may work without, but its safer to directly set the name. Reduces headache ![]() ). Check Connect to named brick and enter the IP adress of the brick (displayed on the brick at startup).baeyens.it/nightly
). Check Connect to named brick and enter the IP adress of the brick (displayed on the brick at startup).baeyens.it/nightly
The installation might take a few minutes because it will install the Arduino Tools as well as required software such as the CDT. Furthermore it will download the newest version of the Arduino software and libraries.
...
Creating an Example Project
The following shows how to create a project, which will turn on a light if a button is pressedan LED on and off repeatedly.
Create a new project:
- Choose File > New > Project > KIELER SCCharts > SCCharts Project
- In the project creation wizard that opens, select Mindstorms NXJ or Mindstorms EV3 (depending on your brick) Arduino as environment and hit finish
- The project wizard from the leJOS plugin Arduino Eclipse Plugin opens. Set the project name to Flashlight and click Blinky and click next.
- Set the configuration for your Arduino board. In the field Upload Protocol select Default.
These settings can be changed later in the project preferences (Right click on project > Preferences > Arduino) - Click finish.
- The project is created and the model file is opened in an editor (This might take a few seconds).
...
| Code Block | ||||||
|---|---|---|---|---|---|---|
| ||||||
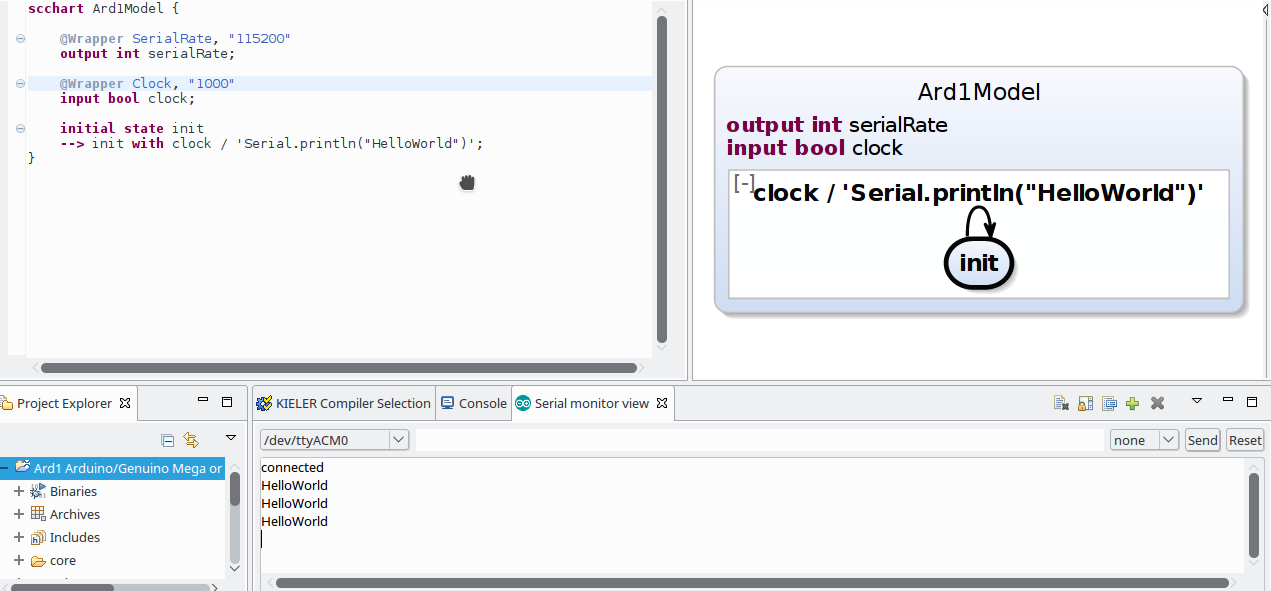
scchart FlashlightBlinkyModel { @Wrapper TouchSensorClock, S4"500" input bool buttonclock; @Wrapper FloodlightDigitalWrite, S1"13" output bool light; initial state lightOff --> lightOn with buttonclock / light = true; state lightOn --> lightOff with !buttonclock / light = false; } |
This model will start in the state lightOff. If the button variable clock is pressedtrue, it will turn on the light and change to the corresponding state, where the light is turned off, as soon as the button is not pressed anymoreswitch its state, going from off to on and from on to off. Thereby it sets the light variable so that the led will blink.
The annotations on the input and output variable are used to define which wrapper code is used to set / read them. @Wrapper TouchSensorClock, S4"500" will set the input variable to true iff the touch sensor on the port S4 is pressed. @Wrapper Floodlight, S1 on the output variable will turn on the red led of the light sensor that is attatched to port S1 iff the variable is truefor one tick every 500ms. @Wrapper DigitalWrite, "13" will set pin 13 to HIGH if the variable is true and to LOW if it is false. We assume that an LED is connected to the Arduino board on pin 13.
The available wrapper code snippets are defined in the snippets directory of the project in ftl files (FreeMarker template files). The table below gives an overview of the available wrapper code snippets.
Note: The Floodlight of the EV3 has a pretty high latency when switching between on and off.Note: To view ftl files with highlighting, you may want to install the FreeMarker IDE feature from the JBoss Tools. However, this is not necessary to work with KIELER. JBoss Tools is available in the Eclipse Market Place and via update site. The update site for Eclipse Luna is http://download.jboss.org/jbosstools/updates/stable/luna/ . Note that only the FreeMarker IDE feature is required (Abridged JBoss Tools > FreeMarker IDE).
...
A launch config is created, which compiles the model to Java C code and creates wrapper code from the annotations in the model file. Afterwards this output is compiled and deployed to the Mindstorms brickArduino board, by using the launch shortcut from the leJOS pluginArduino Plugin. If any errors occur, you can see them in the Console View.
...
There are several wrapper code snippets that can be used as annotations on input and output variables in the model file. These snippets are inserted in the main file template as part of the project launch. The available snippets are listed below.
For sensors, the port has to be on of S1, S2, S3, S4.
For motors / actuators the port has to be one of A, B, C, D.
| Snippet Name and Parameters | Description | Use on | Variable type | Remark | Defined in File | |||||||||
|---|---|---|---|---|---|---|---|---|---|---|---|---|---|---|
| Clock, milliseconds | Sets a variable to true if the time in milliseconds passed. | input | bool | See also ResetClock. | timing.ftl | |||||||||
| ResetClock, clockVariableName, autoFalse | Resets a clock, such that the full time intervall of the clock has to elapse, before the clock will be set to true again. If autoFalse is true, the reset variable will be set to false automatically. | output | bool | autoFalse is true per default. | timing.ftl | |||||||||
| Time | Reads the elapsed time since program start in milliseconds. | input | intunsigned | timing.ftl | ||||||||||
| TickDuration, targetInMilliseconds | Delays the execution until the tick loop takes at least as long as the given target duration. The input variable is set to the actual tick loop duration. | input | intunsigned | Should be used on the very first input variable in the model, such so that waiting is the last action in the tick loop. | timing.ftl | |||||||||
| SleepDelay | Lets the current thread sleep program delay the time in milliseconds of the variable value. | output | intunsigned | timing.ftl | ||||||||||
| PrintSerialRate, autoReset | Prints a string variable if the string is not empty. If autoReset is true then the string variable is set to the empty string after it has been printed | output | string | autoReset is true per default. baud | Sets the baud rate for communication. This is done only in the initilization, not in the loop. | output | unsigned | print.ftl | ||||||
| DrawString, x, yPrint | Prints a string to the given x and y coordinate on the LCDvariable if the string is not 0. | output | string | print.ftlButton | ||||||||||
| DigitalWrite, | buttonIdpin | Sets | a variable to true iff the button on the Mindstorms device is pressed.input | bool | The buttonId has to be one of ENTER, LEFT, RIGHT | touch_and_buttons.ftl | TouchSensor, port | Sets a variable to true iff the touch sensor on the given port is pressed. | inputthe pin value to HIGH if the variable is true and to LOW otherwise. | output | bool | touch | read_and_ | buttonswrite.ftl |
| DigitalRead, | port, percentValuepin | Reads the value of a light sensor. If percentValue is true, the a percent value is retured, based on the light sensor calibration. | input | int | percentValue is not available on EV3 | light.ftl | ||||||||
| CalibrateLightSensor, port, signal | Calibrates a light sensors high or low values. This means if the variable is true, the current value of the light sensor is taken as its reference high / low value. | output | bool | signal has to be one of High, Low | light.ftl | |||||||||
| Floodlight, port | Reads / Sets the state of the red lamp of the light sensor. | input output | bool | light.ftl | ||||||||||
| RCXLamp, port | Turns an RCX lamp on (variable is true) or off (variable is false) | outputSets the variable value to the pin state (HIGH or LOW). | input | bool | light | read_and_write.ftl | MotorSpeed, port, brake | Reads /|||||||
| AnalogWrite, pin | Sets the | speed of the motor in degrees per minute. If the speed value is negative, the motor will drive backwards. If the speed is zero, the motor will actively brake until it stops (brake is true) or remove all power and rollout (brake is false).input output | int | brake is true per default. | motor.ftl | |||||||||
| MotorIsMoving, port | Sets a variable to true iff the motor on the given port is moving. | input | bool | motor.ftl | ||||||||||
| MotorRotation, port | Lets a motor rotate the variable value in degrees. This is only done if the value is unequal zero. If the value is negative, the motor rotates backwards. The variable is set to zero afterwards, such that setting the variable once to a value X, will let the motor rotate X degreesvoltage of the given analog IO pin via pulse-width modulation (PWM). Integers from 0 to 1023 are linearly mapped to an pseudo voltage from 0V to 5V. | output | int | motor | read_and_write.ftl | |||||||||
| BeepAnalogRead, volume | Plays a beep sound as long as the variable is true. | output | bool | default volume is 10 | sound.ftl | |||||||||
| Buzz, volume | Plays a buzz sound as long as the variable is true. | output | bool | default volume is 10 | sound.ftl | |||||||||
| BeepSequence, direction, volume | Plays a sequence of tones in either ascending or descending tone frequency if the variable is true. The variable is set to false automatically. | output | bool | direction has to be one of Up, Down default volume is 10 | sound.ftl | |||||||||
| UltrasonicSensor, port | Reads the distance that an ultrasonic sensor measures. | input | int | ultrasonic.ftl | ||||||||||
| Gyro, port, mode | Reads the value of a gyroscope. | input | int | Not available on NXT mode hat to be one of Angle, Rate | gyro.ftl | |||||||||
| CalibrateGyro, port, autoReset | Resets a gyroscope if the variable is true. If autoReset is true, the variable is set to false automatically. | output | bool | autoReset is true per default | gyro.ftl |
Using the Remote Console (RConsole)
The display of the NXT brick is rather small compared to a Monitor. To ease debugging, one can print to a Remote Console (RConsole), if the USB cable is connected. This enables easier collection for example of sensor data.
To use the RConsole, uncomment the RConsole lines in the wrapper code template Main.ftl. Start the nxjconsoleviewer tool in the bin directory of your leJOS installation. Now, when starting the application, the brick tries to connect with the nxjconsoleviewer. Press the Connect button. If connected succesfully, RConsole.println(...) commands will be written to this window.
...
| pin | Reads the value of the given analog IO pin. Voltage from 0V to 5V is linearly mapped to an integer value from 0 to 1023. | input | int | read_and_write.ftl |
...
Using the Serial Monitor
The Arduino Eclipse Plugin has a Serial Monitor (Window > Show View > Other > Arduino > Serial monitor view). Here you can open connections to serial ports and read and write to them.
To open a connection, click the plus button and select the serial port you want to conenct to as well as the serial rate that is used to transmit data. Click OK.
The output of all open connections will be combined in the text editor.
...
Problem Solving
...
| Issue | Typical Error Messages | Description | Solution | ||
|---|---|---|---|---|---|
| leJOS EV3 does not support Java 8 | "java.lang.UnsupportedClassVersionError" "unsupported major.minor version" | You compile the sources in your project with Java 8 and upload them to the brick. However the lejos EV3 does not support Java 8The upload protocol is not set | avrdude: Error: Could not find USBtiny device (0x1781/0xc9f) | You launch a project and there is no different behaviour although there are changes in code. You try to launch the project and compilation finishes successful. However The upload fails because the upload protocol is not correctly configured. | Go to the project properties and switch to Java 7 select Default in the field Upload Protocol (Right Click click on project > Properties > Java Compiler > Compiler compliance level) |
| Uploading to the brick does not respond | You compile a file successfully and when uploading the result, the connected brick is found. Anyway the upload does not terminate and does not react. | Flash the brick with the current leJOS firmware. If the brick is recognized correctly and the attempt to upload a compiled file fails then the firmware on the brick might be outdated. | |||
| Compilation and uploading works from command line but not when using KIELER | This Java instance does not support a 32-bit JVM. Please install the desired version. | You can compile and upload code to the brick using the command line tools but when using KIELER an error message apprears because Java does not support 32-bit JVM. | Set the LEJOS_NXT_JAVA_HOME environment variable, such that it points to an 32-bit JDK and is visible for GUI applications (or at least KIELER). The process to do so differs on every OS. As alternative, execute KIELER from terminal. | ||
| Brick does nothing after program finished and prints "Program exit" | A program was uploaded and finished without errors. Afterwards the brick prints "Program exit" but does not open the main menu. | This is normal behaviour if uploading a program in debug mode instead run mode (Debug As instead Run As in Eclipse). To get back to the main menu, press the ENTER and ESCAPE button of the brick at the same time.Arduino > Arduino Board Selection) |
Overview
Content Tools