Page History
We use Git to manage our source code. Our Gitorious installation Stash installation is the front end we use to manage our different Git repositories.
...
| Table of Contents |
|---|
Checking Out KIELER
| Note |
|---|
You shouldn't need to check out anything manually if you have installed Eclipse using our Oomph setup. |
KIELER is essentially a large heap of Eclipse plug-ins that aren't easy to find your way through as a new developer. The Overview page has a nice overview of our sub-projects and what plug-ins belong where. This section will tell you how to get the KIELER sources. As for what plug-ins you will actually need to checkout, ask your advisor.
| Info | ||
|---|---|---|
| ||
The Git protocol runs on port 9418, and Repository access via SSH runs on port 22. 7999. For accessing the repositories in read-only mode, HTTP transfer is also possible in read-only mode, but is not recommended due to its bad performance. |
...
. |
Checkout
...
If you need a specific subset of the KIELER plugins, select a suitable project set, copy its URL, and select File - Import - Team - Team Project Set. There are two versions of the project sets:
- Project sets for the Git protocol (read-only; don't take these if you'll be actively developing KIELER code)
- Project sets for the SSH protocol
For access using the SSH protocol you first need to do steps 1 to 3 of the manual checkout section below.
Manual Checkout
In case you only need read access, omit steps 1 to 4 and copy the following URI instead:
git://git.rtsys.informatik.uni-kiel.de/kieler/mainline.gitOtherwise, follow these steps:Git repository is possible either using the SSH or the HTTP protocol. We strongly recommend using SSH; if you still want to use HTTP, omit the SSH key creation and upload in the instructions below.
- If you don't have an SSH key yet, you have to create one. You can do this by:
- Creating one using the command
ssh-keygenon the command line. Simply typessh-keygen, confirm the default destination file ~/.ssh/id_rsa, and choose whether to give a passphrase. If you have a passphrase, you need to enter it whenever you use your SSH key for the first time in a session. You can omit the passphrase, but that makes the key less secure. As result, the tool generates a private key ~/.ssh/id_rsa, which has to be kept secret, and a public key ~/.ssh/id_rsa.pub. - Using eclipse Eclipse to generate it. You can find this function under Preferences - General - Network Connections - SSH2 - Key Management.
- Creating one using the command
- Register with Gitorious and Stash and upload your public SSH key (Dashboard Profile - Manage SSH keys Keys - Add SSH key).Ask a KIELER administrator to add you to the kieler-dev Gitorious teamKey).
- Copy one of the repository URI following repository URIs into the clipboard:
ssh://git@git.rtsys.informatik.uni-kiel.de:kieler/mainline.git into the clipboard.7999/KIELER/the_repo_to_clone.gitwherethe_repo_to_cloneis eitherpragmaticsorsemantics(if in doubt, ask your adviser which of these you need). If you for whatever reason insist on using the less efficient HTTP protocol, use the following URI:http://youraccountname@git.rtsys.informatik.uni-kiel.de/scm/KIELER/the_repo_to_clone.git) - Open the Git Repositories view, right-click it, select Paste Repository Path or URI, select ssh connection protocol, Next, select master branch, Next, select destination directory (e.g. /home/<username>/shared/kieler), Finish. Wait for the repository to be downloaded to your computer. Note that the whole history of the repository will be stored in your local filesystem, which is pretty awesome.
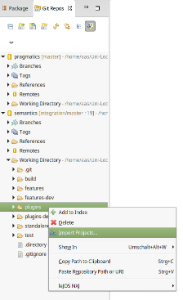
- Right-click the Working directory entry in the kieler repository, select Import Projects, Next, select the projects that you want in your workspace, Finish.
...
- .
Checking out on the command line is done with the command git clone <URI> <local path>. Instead of the URI you can also use a path to an existing a local repository, which then creates a clone of that repository.
...
- Click the button Add an existing local Git Repository to this view in the Git Repositories view and enter the local path.
- Import the plugin projects that you need.
Importing Plugins to the Eclipse Workspace
In the Git Repository View, perform Right-click
...
> Import Projects... on the Working directory or Plugins folder. Hit Next. In the following dialog you can Deselect all and afterwards select the plugins that you need for your developing task.
For example, if you want to start KIELER with SCCharts you need to import
all core plugins (core.*) from the semantics and pragmatics repositories
- all SCCharts plugins (sccharts.*) from the semantics repository, unless sccharts.prio.dependencies, sccharts.prio.dependencies.klighd, sccharts.prio.s, sccharts.prio.sim.s
- all required plugins for the already imported ones
As a result you will have the following plugin projects in your workspace:
- From the pragmatics repo: core, core.kgraph, core.kgraph.text, core.kgraph.text.ui, core.kivi, core.krendering, core.krendering.extensions, core.ui, kiml, kiml.formats, kiml.graphviz.dot, kiml.graphviz.layouter, kiml.service, kiml.ui, klay.layered, klighd, klighd.piccolo, klighd.ui, edu.umd.cs.piccolo
- From the semantics repo: core.annotations, core.annotations.edit, core.annotations.text, core.annotations.text.ui, core.kexpressions, core.kexpressions.edit, core.kexpressions.keffects, core.kexpressions.keffects.edit, core.kexpressions.keffects.ui, core.kexpressions.text, core.kexpressions.text.ui, core.kexpressions.ui, core.model, core.perspectives, core.product, kex, kex.ui, kico, kico.klighd, kico.ui, kitt, kitt.klighd, prom, s, s.sc, s.sim, s.sim.kivi, s.sim.sc, s.sim.sj, s.sj, s.ui, sc, sccharts, sccharts.edit, sccharts.editor, sccharts.eso, sccharts.kivi, sccharts.klighd, sccharts.prom, sccharts.s, sccharts.scg, sccharts.sim.c, sccharts.sim.s, sccharts.text, sccharts.text.ui, scg, scg.s, scl, sim.benchmark, sim.instructions, sim.kiem, sim.kiem.config, sim.kiem.ui, sim.kiem.ui.datacomponent, sim.kivi, sim.signals, sim.signals.ui, sim.syncsignalreset, sim.table, sjl, org.freemarker, org.json
Troubleshooting / Resolving Plugin Dependencies
If there are errors in your workspace, they are most likely the result of missing plugins. To solve this, check if the MANIFEST.MF file of the project has error markers. Import missing plugin dependencies if required.
After all dependencies are solved and there are still errors, you should clean your workspace via Project > Clean > All projects.
If there are errors in an xtend-gen folder you can delete this folder so that the contents are re-compiled. (It sometimes happens that this folder is not deleted as part of the clean.)
There should not be any errors after all required plugins are imported and compiled correctly.
Updating the Repository
Your working copy must be clean before you can merge any updates into it. Therefore, always commit your changes locally before you pull. If you don't want to commit them into the master branch, commit them into a new branch. Note that pulling is the same as fetching remote changes and merging them into your local branch. Since a normal merge operation is involved, this can lead to conflicts, which need to be resolved as described below. Note that pulling always merges the remote changes into your current branch. If that's not what you want, checkout the correct branch first or just do a fetch.
...
By giving a branch, tag, or commit number in git checkout <commit> <path>, you can get to any existing version of the files. If no path is given, git checkout <commit> switches your whole working copy and index to the specified branch, tag, or commit number. If If git reset is given a commit number, the current branch is modified to point at the given commit.
...
In case the working directory is messed up with unstaged files, which are not affected by git reset --hard, a clean up is achieved by means of git clean -f. The additional switch switch -d applies this to directories, respectively. Hence, git reset + followed by git clean act like svn revert.
git clean -X removes only the files that are ignored by Git, that is mainly the .class files generated by the Java compiler. A full rebuild is required afterwards.
Branching and Merging
Branches are used to structure your development and are an essential tool for effective work in the KIELER team. Read the Source Code Management page if you haven't yet understood what branches are good for.
Creating a Branch
Do one of the following:
- Right-click the KIELER repository in the Git Repositories view, click Switch To, click New Branch.
- On the command line, enter
git branch <name>. In this case, the new branch is not active; if you want to activate the new branch while creating it, entergit checkout -b <name>.
In either case the new branch starts at the current position of your working copy, i.e. it branches from the current branch you are on. In order to branch from a different position, either check out that other branch first or select it as source ref in the EGit wizard (on the command line simply type git branch <name> <start_point>).
Switching to Another Branch
Do one of the following:
- Navigate to the branch in the KIELER repository in the Git Repositories view, right click it, click Checkout.
- On the command-line, enter
git checkout <name>.
Note that your local uncommitted changes are transferred when switching the current branch.
Merging
...
Branches
You always merge another branch into the current branch. Therefore you first have to checkout the target branch prior to merging. Then, do one of the following:
- Navigate to the source branch in the Git Repositories view, right-click it, click Merge.
- On the command line, enter
git merge <source_name>.
This creates a new merge commit, i.e. a commit with two source commits, and the target branch (the one you're currently on) contains all changes that have been done in the source branch (the one selected for merge). The source branch is not modified. A merge is done implicitly when pulling: assuming you're on branch master, the command git pull origin master is the same as git fetch origin followed by git merge origin/master, where origin/master is the remote tracking branch for master.
Working With Multiple Remote Repositories
Stash allows the creation of personal server-side clones of the KIELER repository, which is highly encouraged as described on the Source Code Management page. When working with such clones, it is often necessary to synchronize the different server-side repositories with the local one. Git supports this by allowing to configure multiple remotes in the local repository. On the command line this is done simply by entering git remote add <name> <url>, where <name> is an arbitrary local identifier for the remote repository. For example, a remote named origin is automatically created when a local repository clone is created through git clone <url>.
When you push or pull branches, simply select the remote you wish to interfere with. Pulling is done by git pull <remote> <branch>, and pushing is done by git push <remote> <branch>.
Overview
Content Tools