...
- Eclipse Plug-ins and Extension Points
- Eclipse Modeling Framework (EMF)
- This tutorial needs the turingmachine.ecore and the controller you've implemented in the EMF tutorial. If you did not complete the EMF tutorial, you may download a working turing machine here... (in the future).
Brainfuck
Basically, you are going to write an Xtext grammar for Brainfuck (BF) in this tutorial. Conceptionally BF programs are working on an endless tape. The program can navigate from cell to cell on the tape and modify the value stored in a particular cell. Your BF language should know the following commands:
| < | Move one cell to the left on the tape. |
| > | Move one cell to the right on the tape. |
| + | Increment the value in the actual cell. |
| - | Decrement the value in the actual cell. |
| . | Print the actual cell to the console. |
| [ | If the value in the actual cell is 0, jump to the instruction after the corresponding ] |
| ] | If the value of the actual cell is not 0, jump to the instruction after the corresponding [ |
Creating a Grammar
An Xtext grammar is always related to a specific EMF meta model. The grammar defines a concrete syntax in which instances of the meta model (the abstract syntax) can be serialized and stored. Xtext supports two ways of linking a grammar with a meta model: either creating a grammar for an existing meta model, or creating a grammar first and generating a meta model out of it. Here we will use the former approach, reusing the meta model for Turing Machines that you already defined earlier.. In this tutorial you will create a new grammar from scratch!
- Select File → New → Project... → Xtext → Xtext Project → Next
- Enter the following values:
- Project name: de.cau.cs.rtprak.<login>.brainfuck (like in previous tutorials, replace "login" by your login name)
- Location: your repository path
- Name: de.cau.cs.rtprak.<login>.turing.brainfuck.Brainfuck
- Extensions: brainfuck (the file extension under which your text files will be stored)
- Uncheck Create SDK feature project (not required)
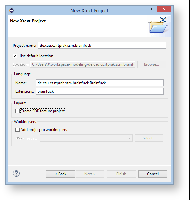
- Finish → an editor is opened with a predefined grammar (Brainfuck.xtext).
Code Block language text grammar de.cau.cs.rtprak.ssm.brainfuck.Brainfuck with org.eclipse.xtext.common.Terminals generate brainfuck "http://www.cau.de/cs/rtprak/ssm/brainfuck/Brainfuck" Model: greetings+=Greeting*; Greeting: 'Hello' name=ID '!'; - As you can see in the pre-defined grammar, two grammar rules already exist, Model and Greeting.
- In the Model rule a field greetings (actually a list indicated by the +=) is generated. greetings may contain tokens from the Greeting rule. The list may contain arbitrary many items (indicated by the *)
- The Greeting rule expects the keyword Hello and then a name (defined by ID which is a subset of an arbitrary STRING defined in the Terminals definition imported at the top of the grammar). The rule expects a closing exclamation mark!
- Actually, let's try out the pre-defined grammar.

Open the manifest of the newly created project and add org.eclipse.equinox.common to the required plugins. This is required to start the use the modeling workflow engine to create your DSL automatically.
- The Brainfuck.xtext file is located in the package de.cau.cs.rtprak.<login>.turing.text together with a Modeling Workflow Engine file, which can be used to configure code generation. Right-click GenerateTuring.mwe2 and select Run As → MWE2 Workflow. If you get an error message like "*ATTENTION* It is recommended to use the ANTLR 3 parser generator" in the console, type n and install Antlr from the update site.
- Now a great amount of Java code should have been generated. Add the new plugins to your Eclipse run configuration and start it.
- In the new Eclipse instance, create an empty project and add a file: File → New → File and name it test.brainfuck (when asked to add the Xtext nature, hit Yes).
- Use the content assist to generate a valid syntax. Watch the outline while you edit the file. The model objects are created as you type.
- Now, close your eclipse instance and modify your Brainfuck grammar so that Brainfuck programs become valid. There is more than one way to do that... be creative and/or discuss possible grammars with your fellow students. If you need help with the Xtext syntax, contact the Xtext manual: http://www.eclipse.org/Xtext/
- Re-generate your Brainfuck code and re-run your eclipse instance.
- Use ctrl + space for getting content assist to validate your program syntax. All Brainfuck commands should be visible.