The service-based layout integrates into KIELER quite transparently both from the technical as well as from the user's point of view. You configure your layout, e.g. which layout algorithm to use or which orientation edges shall have, in the same way as you would do with the layout integrated in KIELER, called the local layout. Basically, there are only two additions to the GUI:
- The status symbol informs you about the layout mode you are currently using. It allows you to switch between local and service-based layout. You can also get information about statistical data regarding the last service-based layouts you have done.
- The preference page gives you the necessary options to configure the service-based layout.
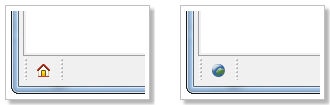
As you can see in the following figure, the status symbol can have one of two forms. The left figure shows how it looks when you are using local and the right figure when you are using service-based layout.
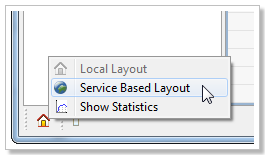
When you do a click on the symbol with the right mouse button it displays a context menu, as shown by the next figure, where you can switch between the layout modes. You can also open a dialog that shows statistical data about the service-based layouts you have done before. In the shown menu the entry for local layout is disabled since service-based layout is already used.
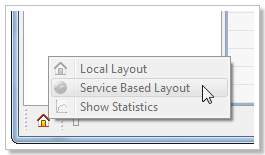
As the service-based layout provides the same functionality as the local layout it is considered to be an optional part of the KIELER modeling environment. While KIELER contains the basic support, the clients required to interact with a service are optional. You have to install them manually according to your needs. Therefore, when you have a fresh installation of KIELER or you have updated your Eclipse installation with a KIELER layout feature, the status symbol displays local layout and all entries in the context menu are disabled, as you can see in the figure below.
If you do a double-click on the symbol the preference page opens. You will see a page similar to the one shown by the next figure. It tells you how you can install a client feature.

The server provides its layout using two different architectures:
- the JAX-WS web service uses the reference implementation of JAX-WS and
- the jETI service uses the jETI platform.
Each type of service requires a different client and the KWebS project provides a feature for each one:
- the KIELER Layout Client over JAX-WS and
- the KIELER Layout Client over jETI.
Since the service-based layout is optional, and due to the fact that a provider can decide which type of service it supports, you have to install the necessary feature that is compatible with the type of service your provider has chosen to deliver. You can do so by using the "Install New Software..." entry in the "Help" menu of your Eclipse or KIELER installation and using the KIELER update site. When you have installed a client feature the preference page looks as shown by the next figure. The first option you can use is to switch between the layout modes by selecting the appropriate Layout Type. Furthermore, you can configure your preferred providers. In the displayed example, both available client features are installed. Each feature comes with a standard provider that is hosted by the KIELER project. In the displayed preference page these are the providers KIELER Demo Layout Service (HTTP) for the JAX-WS service and KIELER Demo Layout Service (jETI) for the jETI service. You cannot alter or remove these providers, therefore they are marked with a "lock" symbol ( ). The provider you have currently selected for doing service-based layout, the active provider, is marked with a green "O.k." symbol (
 ). In the example this is the provider RTSYS HTTP.
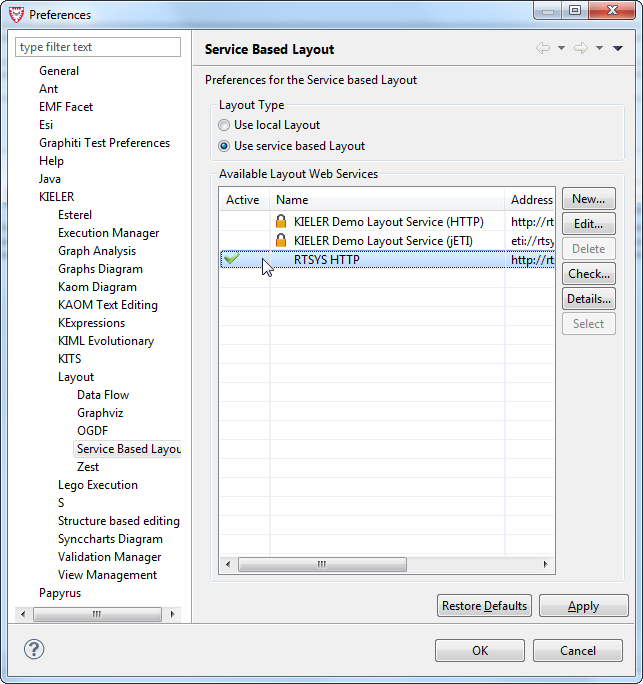
You can add a new provider by clicking the New... button or use the Edit... button to alter an existing one. With the Check... button you can test whether the selected provider is currently available. The Details... button opens a dialog that informs you about the details of the selected provider, e.g. what layout algorithms and formats it supports. You can also delete a provider as long as he is not a standard or the active provider. In the shown preference page this is the case, therefore, the Delete button is disabled. The Select button sets the currently selected provider as active. In the displayed preference page he is also disabled, since the selected provider is already the active one.
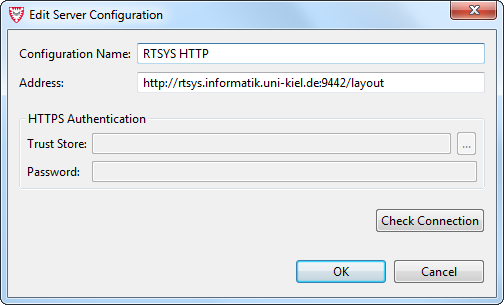
For creating or editing a provider a dialog opens that looks like the one shown by the next figure. You can configure the name of the provider in the field named Configuration Name and the address of the service with the field named Address. In addition, you can set the Trust Store and the required password for a service that is secured through HTTPS. In the example these options are disabled. They are being enabled when the address defines HTTPS as protocol. The Check Connection button gives you the possibility to test whether the provider you configured is currently available.
If you want to use a service that is secured with HTTPS you need to obtain the trust store and its password. The provider of a secured service is responsible to decide how he publishes these resources to its users. The demo service of the KIELER project provides the trust store on its support page located at
http://layout.rtsys.informatik.uni-kiel.de:9444/index.html
and the password is client.
Overview
Content Tools