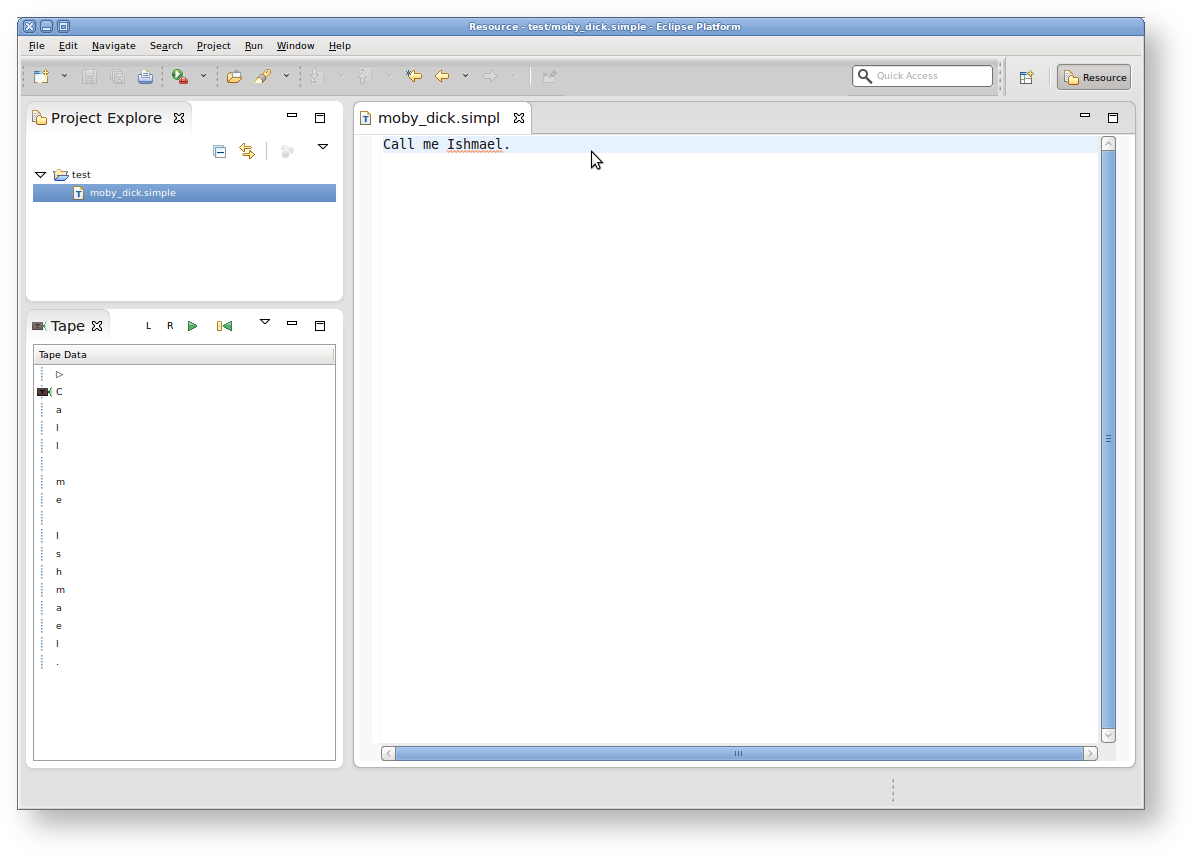
This tutorial will teach you the basics of writing plugins that run inside the Eclipse framework. You will learn about editors, views, and extension points by creating one of each yourself. Once you're done with this tutorial, you will have an application that will look something like this:
You may want to download the slides of the presentation explaining the basic concepts you will explore in this tutorial.
Preliminaries
There's a few things to do before we dive into the tutorial itself. For example, to do Eclipse programming, you will have to get your hands on an Eclipse installation first. Read through the following sections to get ready for the tutorial tasks.
Required Software
For this tutorial, we need you to have Eclipse and Git installed:
- Install Eclipse. For what we do, we recommend installing the Eclipse Modeling Tools, with a few extras. Our Wiki page on getting Eclipse has the details: simply follow the instructions for downloading and installing Eclipse and you should be set.
- You should already have obtained a working Git installation for the first tutorial.
General Remarks
Over the course of this tutorial, you will be writing a bit of code. Here's a few rules we ask you to follow:
- All your Java code should be in packages with the prefix
de.cau.cs.rtprak.login, whereloginis your login name as used for your email address at the institute. From now on, this rule will apply to all tutorials. Once we start with the actual practical projects, we will choose another package name. - All Java classes, fields, and methods should be thoroughly commented with the standard Javadoc comment format. Javadoc comments are well supported by Eclipse, providing code completion, syntax highlighting, and further features to help you. The code inside your methods should also be well commented. Try to think about what kinds of information would help someone unfamiliar with your code understand it.
- As you will already have noticed during the first tutorial, our tutorials use Turing machines as the underlying theme. This is partly because we're computer scientists and computer scientists are expected to choose computer sciency examples, but mostly because Turing machines work great as examples for the different kinds of topics we will be covering with you. You may thus want to take some time to read up again on the topic. Wikipedia or the material of your Theoretical Computer Science lecture might be a great start.
- During this tutorial, we will be using Git mostly from the command line instead of using Eclipse's built-in Git support. This is because we've found Eclipse's Git support to be too unstable and buggy for us to trust it completely.
Finding Documentation
During the tutorial, we will cover each topic only briefly, so it is always a good idea to find more information online. Here's some more resources that will prove helpful:
- Java Platform, Standard Edition 6 API Specification
As Java programmers, you will already know this one, but it's so important and helpful that it's worth repeating. The API documentation contains just about everything you need to know about the API provided by Java6. - Eclipse Help System
Eclipse comes with its own help system that contains a wealth of information. You will be spending most of your time in the Platform Plug-in Developer Guide, which contains the following three important sections:- Programmer's Guide
When you encounter a new topic, such as SWT or JFace, the Programmer's Guide often contains helpful articles to give you a first overview. Recommended reading. - References -> API Reference
One of the two most important parts of the Eclipse Help System, the API Reference contains the Javadoc documentation of all Eclipse framework classes. Extremely helpful. - References -> Extension Points Reference
The other of the two most important parts of the Eclipse Help System, the Extension Point Reference lists all extension points of the Eclipse framework along with information about what they are and how to use them. Also extremely helpful.
- Programmer's Guide
- Eclipsepedia
The official Eclipse Wiki. Contains a wealth of information on Eclipse programming. - Eclipse Resources
Provides forums, tutorials, articles, presentations, etc. on Eclipse and Eclipse-related topics.
You will find that despite of all of these resources Eclipse is still not as well commented and documented as we'd like it to be. Finding out how stuff works in the world of Eclipse can thus sometimes be a challenge. However, this does not only apply to you, but also to many people who are conveniently connected by something called The Internet. It should go without saying that if all else fails, Google often turns up great tutorials or solutions to problems you may run into. And if it doesn't, Miro and I will be happy to help you as well.
Preparing the Repository
We have created a Git repository for everyone to do his tutorials in. You can access the repository online through our Stash tool over here. You will first have to configure your Stash account:
- Login with your Rtsys account information.
- Through the button in the top right corner, access your profile.
- Switch to the SSH keys tab.
- Click Add Key and upload a public SSH key that you want to use to access the repository.
You should now be able to access the repository. Clone it:
- Open a console window and navigate to an empty directory that the repository should be placed in.
- Enter the command
ssh://git@git.rtsys.informatik.uni-kiel.de:7999/PRAK/12ws-eclipse-tutorials.git .(including the final dot, which tells git to clone the repository into the current directory instead of a subdirectory). - You should now have a clone of the repository in the current directory.
You will use this repository for all your tutorial work, along with everyone else. To make sure that you don't interfere with each other, everyone will work on a different branch. This is not exactly how people usually use Git, but goes to demonstrate Git's flexibility... Add a branch for you to work in:
- Enter
git checkout -b login_name
You have just added and checked out a new branch. Everything you commit will go to this branch. To push your local commits to the server (which you will need to do so we can access your results), do the following:
- Enter
git push origin login_name
You would usually have to enter git pull first, but since nobody will mess with your branch this won't be necessary. By the way, you only need to mention origin login_name with the first git push, since Git doesn't know where to push the branch yet. After the first time, Git remembers the information and it will be enough to just enter git push.
Creating a Simple Text Editor
OK, with all the preliminaries out of the way let's get working. Fire up Eclipse, choose an empty workspace, close the Welcome panel it will present you with and follow the following steps.
Creating a New Plugin
For our text editor to integrate into Eclipse, we need to create a plug-in project for it:
- New -> Project...
- In the project wizard, choose Plug-in Project and click Next.
- As the project name, enter
de.cau.cs.rtprak.login.simple. Uncheck Use default location (which would put the project into your workspace), and put it into your local clone of the Git repository instead (the Location should read something like/path/to/git/repository/de.cau.cs.rtprak.login.simple). Click Next. - As the name, enter
Simple (login). Also, make sure that Generate an activator and This plug-in will make contributions to the UI are both checked. Click Finish. (Eclipse might ask you whether you want to switch to the Plug-in Development Perspective, which configures Eclipse to provide the views that are important for plug-in development. Choose Yes. Or No. It won't have a big influence on your future...) - Eclipse has now created your new plug-in and was nice enough to open the Plug-in Manifest Editor, which allows you to graphically edit two important files of your plugin:
plugin.xmlandMETA-INF/MANIFEST.MF. (By the way, this would be a great time to research the editor and the two files online.) Basically, those two files provide information that tell Eclipse what other plug-ins your plug-in needs and how it works together with other plug-ins by providing extensions and extension points. Our new plug-in will depend on two other plug-ins, so switch to the Dependencies tab of the editor and add dependencies toorg.eclipse.ui.editorsandorg.eclipse.jface.text. Save the editor and close it. (You can always reopen it by opening one of the two mentioned files from the Package Explorer.) - Tell Eclipse that the project is inside a Git repository. Right-click on the project, click Team, and click Share Project. Select Git as the repository type and click Next. The repository information should appear and you should be able to simply click Finish.
Create the Main Editor Class
We will now create the class that implements the simple text editor. There won't be any programming involved here since we're lazy; instead, we will just inherit from an existing simple text editor.
- New -> Class.
- Package:
de.cau.cs.rtprak.login.simple.editors. Name:SimpleEditorPart. Superclass:org.eclipse.ui.editors.text.TextEditor. Click Finish.
Register the Editor
For the editor to be available inside Eclipse, we will have to register it by adding an extension to an extension point.
- Copy the attached file to a new subfolder icons in the plug-in folder (right-click the plug-in folder in the Package Explorer and choose New -> Folder...). You can copy the file by importing it from inside Eclipse (File -> Import... -> File System) or by copying it from outside Eclipse and refreshing the plug-in project afterwards (right-click the plug-in folder in the Package Explorer and choose Refresh).
- Open the Plug-in Manifest Editor again and switch to the Extensions tab.
- Click Add..., choose the
org.eclipse.ui.editorsextension point and click Finish. - The extension point is now shown in the list of extensions, along with an editor extension. Select that extension and edit its details using the fields on the right. Set the ID to
de.cau.cs.rtprak.login.simple.editor, the name toSimple Text Editor, the icon toicons/turing-file.gif, the extensions tosimple, the class tode.cau.cs.rtprak.login.simple.editors.SimpleEditorPart, and the default totrue. - Save the manifest editor.
Test the Editor
It's time to test your new simple editor in a new Eclipse instance.
- Switch back to the Overview tab of the Plug-in Manifest Editor.
- Click Launch an Eclipse Application.
- For future tests, you can now select Eclipse Application in the run menu.
- To enable debug mode for your test instances: open the Run Configurations dialog, select the Arguments tab of the Eclipse Application configuration, and add -debug -consoleLog as program arguments. This dumps all errors and exceptions to the console view, so you can directly see what went wrong.
- To improve performance, select only the plugins that are necessary: in the Plug-ins tab select Launch with plug-ins selected below only, deselect Target Platform, select Workspace, and then Add Required Plug-ins.
- Make sure that org.eclipse.ui.ide.application is also selected, else you won't be able to launch Eclipse.
- The requirements list needs to be updated when the dependencies of your plugins have changed; click Add Required Plug-ins again for updating.
- In the new Eclipse instance, click New -> Project... -> General -> Project. Enter
testas the project name. - Right-click the new project and click New -> File... As the file name, enter
test.simple. This will create a new file with that name and open the file in your newly added text editor. (You can see that it is your editor by looking at the editor icon, which should look like the icon you downloaded and put into the icons folder.)
Creating a Simple View
The next task consists of creating a view that is able to display the state of a Turing Machine. We will do this using a table with one column, where each row represents an entry on the tape of the Turing Machine. The tape shall be infinite to one side, and the position of the read/write head shall be movable by two buttons. The content of the tape shall be determined by the currently active instance of our simple text editor.
Hint
In the following, we will be making use of the Standard Widget Toolkit (SWT) and JFace to build a user interface. It might be a good idea now to search for an introduction to SWT and JFace concepts on the Internet before you proceed.
Creating the View Class
We will start by creating a class that will define the view.
- Create a class
TapeViewPartin a new packagede.cau.cs.rtprak.login.simple.viewsthat extends the ViewPart class. (make sure that in the New Java Class wizard, the option Inherited abstract methods is checked.) - Add a private field
tableViewerof type TableViewer. Your
TableViewPartcontains a still empty methodcreatePartControl. This method will be responsible for creating the user interface components of your view. Add the following code to create the table we want to display:Table table = new Table(parent, SWT.BORDER); table.setHeaderVisible(true); TableColumn column = new TableColumn(table, SWT.NONE); column.setWidth(80); column.setText("Tape Data"); tableViewer = new TableViewer(table);The
setFocusmethod controls what happens when your part gets the focus. Make sure the focus will then automatically be set to the table by adding the following code:tableViewer.getControl().setFocus();
Create the View Extension
We will now have to register our new view with Eclipse so that it can be seamlessly integrated into the workbench.
- Copy the three files tape_head.gif, head_present.gif, and head_absent.gif to the
iconssubfolder of your plug-in as you did it before. (You might need to refresh your project again if you did the copying outside of Eclipse.) - Open the
plugin.xmlfile in the Plugin Manifest Editor and switch to the Extensions tab. - Click Add to add a new extension for the extension point
org.eclipse.ui.views. Right-click the newly added extension and add a newviewelement through the New menu. - Set the view element's properties as follows: ID
de.cau.cs.rtprak.login.simple.view, nameTape, classde.cau.cs.rtprak.login.simple.views.TapeViewPart, categoryorg.eclipse.ui, iconicons/tape_head.gif.
When you start the application, you should now be able to open your view by clicking Window -> Show View -> Other.
Add Content and Label Providers
The idea of JFace viewers is to abstract a bit from the underlying widget (in our case, the table) and instead work on data models that are to be viewed. Instead of adding items to the table directly, the table viewer is supplied with an input object, a content provider, and a label provider. The content provider allows the viewer to make sense of the input object and basically allows the viewer to access the input object's data. The label provider translates each item of data into text and icons that can be used to present the item to the user in the table.
We will now create content and label providers to do just that.
Create a class
TuringTapein a new packagede.cau.cs.rtprak.login.simple.modelwith the following fields:private int headPosition = 1; private StringBuffer text = new StringBuffer();
Also add corresponding getter and setter methods. (You can simply right-click somewhere in the class and choose Source -> Generate Getters and Setters.)
Add two constants to the class:
public static final char START_CHAR = '\u25b7';
public static final char BLANK_CHAR = '\u25fb';
- Add a method
getCharacter(int pos)that calculates the tape character at positionposas follows:- For
pos == 0, return the characterSTART_CHAR. - For
pos > text.length(), return the characterBLANK_CHAR. - Otherwise, return the text character at index
pos - 1.
- For
- Add a private field tape of type
TuringTapetoTapeViewPartand initialize it with a new instance. - Create a class
TapeDatainde.cau.cs.rtprak.login.simple.modelwith two fieldsint indexandchar character, and add a constructor for initialization as well as corresponding getter methods. - Create a class
TapeContentProviderin thede.cau.cs.rtprak.login.simple.viewspackage that implements IStructuredContentProvider.- The methods
dispose()andinputChanged()may remain empty. - The method
getElements()must return an array of objects, where each object must contain all necessary data to be displayed in a single row of the table. The number of returned objects corresponds to the number of rows. - Suppose the input element is an instance of
TuringTape. The result ofgetElements()shall be an array ofTapeDataelements. The size of the array shall be one more than the maximum of the tape head position and the length of the tape text. The index and character of each tape data element shall be filled withiand the result ofturingTape.getCharacter(i), respectively, whereiis the array index of the element.
- The methods
- Create a class
TapeLabelProviderin thede.cau.cs.rtprak.login.simple.viewspackage that extends BaseLabelProvider and implements ITableLabelProvider.- Add a private field
tapeof typeTuringTapethat is initialized from the constructor. - Add fields
presentImageandabsentImageof type Image. Initialize each image using the following code, where
path_to_imageisicons/head_present.gifandicons/head_absent.gif, respectively:image = Activator.imageDescriptorFromPlugin(Activator.PLUGIN_ID, "path_to_image").createImage();
- Override the implementation of
dispose()inTapeLabelProviderto dispose both images after callingsuper.dispose(). (Right-click in the source-code and click Source -> Override/Implement Methods.) - In
getColumnImage()andgetColumnText(), first check whether the element is an instance ofTapeDataand the column index is 0, and returnnullotherwise. If the check passes, return the following:getColumnImage():presentImageif the index given by the tape data element equals the current value oftape.getHeadPosition(),absentImageotherwise.getColumnText(): aStringcontaining the character of the tape data element.
- Add a private field
Add the following lines to
createPartControl()inTapeViewPart:tableViewer.setContentProvider(new TapeContentProvider()); tableViewer.setLabelProvider(new TapeLabelProvider(tape)); tableViewer.setInput(tape);
Use Simple Text Editor as Tape View Input
We will now add code to make the Tape view display the content of a currently active Simple Text Editor.
Add the following methods to
SimpleEditorPart:/** * Returns the text that is currently displayed in the editor. * @return the currently displayed text */ public String getText() { return getDocumentProvider().getDocument(getEditorInput()).get(); } /** The listener that is currently registered for this editor. */ private IDocumentListener registeredListener; /** * Registers the given runnable as listener for changes to the text * of this editor. * @param runnable a runnable to register as text listener */ public void registerTextListener(final Runnable runnable) { registeredListener = new IDocumentListener() { public void documentAboutToBeChanged(DocumentEvent event) {} public void documentChanged(DocumentEvent event) { runnable.run(); } }; getDocumentProvider().getDocument(getEditorInput()) .addDocumentListener(registeredListener); } /** * Removes the last registered text listener. */ public void disposeTextListener() { if (registeredListener != null) { if (getDocumentProvider() != null) { getDocumentProvider().getDocument(getEditorInput()) .removeDocumentListener(registeredListener); } registeredListener = null; } }Add the following code to
TapeViewPart:/** The editor part that is currently set as input for the viewer. */ private SimpleEditorPart currentInput; /** * Sets the displayed text of the given editor part as input of the * viewer, if the editor part is a SimpleEditorPart. * @param part workbench part to set as input */ private void setInput(final IWorkbenchPart part) { if (part instanceof SimpleEditorPart && part != currentInput) { if (currentInput != null) { currentInput.disposeTextListener(); } currentInput = (SimpleEditorPart) part; Runnable runnable = new Runnable() { public void run() { tape.setText(new StringBuffer(currentInput.getText())); tableViewer.refresh(); } }; runnable.run(); currentInput.registerTextListener(runnable); } }Add the following code to
createPartControl():IWorkbenchWindow workbenchWindow = getSite().getWorkbenchWindow(); IWorkbenchPage activePage = workbenchWindow.getActivePage(); if (activePage != null) { setInput(activePage.getActivePart()); } workbenchWindow.getPartService().addPartListener(new IPartListener() { public void partActivated(final IWorkbenchPart part) { setInput(part); } public void partDeactivated(final IWorkbenchPart part) {} public void partBroughtToTop(final IWorkbenchPart part) {} public void partClosed(final IWorkbenchPart part) {} public void partOpened(final IWorkbenchPart part) {} });
Create Actions to Move the Tape Head
If we want to add buttons to the view's tool bar, we will have to ask its IToolbarManager to do that for us:
Get the tool bar manager using the following code:
IToolBarManager toolBarManager = getViewSite().getActionBars().getToolBarManager();
- Add two actions to the toolbar manager by extending the class Action and implementing the
run()method.- It is convenient to add actions as anonymous nested classes.
- The first action shall have the text "L". When it is run, it shall move the head to the left (to the top in the table viewer), if the head is not already at position 0.
- The second action shall have the text "R". When it is run, it shall move the head to the right.
- You should call
tableViewer.refresh()after any change to thetape.headPositionvariable.
Test the View
If you open an instance of the simple text editor and open the Tape view, the view should correctly display the editor's text on a tape, and the L and R buttons should move the tape head.
Creating an Extension Point
For the final part of the tutorial, we will now use the extension point mechanism of Eclipse to add some behavior to our Turing Machines. An extension point is basically a well-defined point where other plug-ins can register to add functionality. The extension point is basically defined by an XML Schema file that defines an interface; other plug-ins may access this interface using XML code in their plugin.xml file, so-called extensions. Our extension point will provide an interface for classes that define behavior of a Turing Machine, and we will call them head controllers (programs that control the tape head).
Defining a Command Class
We will start by defining a class representing a command that will be passed to a selected head controller.
- Add a class
HeadCommandto the packagede.cau.cs.rtprak.login.simple.controller. - Add a nested public static enumeration
Actionwith valuesWRITE,ERASE, andNULL. - Add a nested public static enumeration
Directionwith valuesLEFT,RIGHT, andNONE. Add the following private fields:
private Action action;
private Direction direction;
private char newChar;
- Add a constructor to initialize the fields.
- Add getter methods to access the fields.
Defining the Controller Interface
We will now define an interface that all head controllers will have to implement:
- Add an interface
IHeadControllerin the packagede.cau.cs.rtprak.login.simple.controller. Add the following methods to the interface:
/**
 * Calculate the next command depending on the currently seen character.
 * @param character the currently seen character
 * @return the next command specifying which character to write and
 *     which direction to move the head
 */
HeadCommand nextCommand(char character);

/**
 * Reset the internal state of the head controller.
 */
void reset();
Defining the Extension Point
We will now define the extension point that head controllers will be registered at.
- Open the
plugin.xmlfile in the Plugin Manifest Editor and switch to the Extension Points tab. - Click the Add button and enter
de.cau.cs.rtprak.login.simple.headControllersas the extension point's ID, andHead Controllersas its name. Shorten the schema file's file name toschema/headControllers.exsd. Make sure that Edit extension point schema when done is checked and click Finish. - Eclipse will now have opened the new schema file in the Extension Point Schema Editor, a graphical editor similar to the Plugin Manifest Editor that provides a way to define things that might be easier than directly editing the text files.
- In the new editor, open the Definition tab.
- Add a new element named
controller. - Add three new attributes to the
controllerelement:- First attribute: name
id, userequired, typestring, translatablefalse. - Second attribute: name
name, userequired, typestring, translatabletrue. - Third attribute: name
class, userequired, typejava, implementsde.cau.cs.rtprak.login.simple.controller.IHeadController. This is the attribute that will tell us which Java class actually implements the controller that is to be registered at our extension point. To make sure that we know how to speak to the class, we require it to implement the interface we defined for head controllers.
- First attribute: name
- Add a sequence to the
extensionelement. Right-click the sequence and click New -> controller. Set the Min Occurrences of the sequence to 0, and set Max Occurrences to be Unbounded. - Save the editor and switch back to the Plugin Manifest Editor.
- On the Runtime tab, add
de.cau.cs.rtprak.login.simple.controllerto the list of packages exported by the plug-in. This is necessary because plug-ins that want to provide extensions for the extension point must provide a class that implementsIHeadController. For this to work, those plug-ins must have access to that interface; thus, we have to export the package containing it.
Accessing the Extension Point
We will now add a class that will be in charge of loading all extensions registered at our new extension point.
Add a class
HeadControllersto the packagede.cau.cs.rtprak.login.simple.controller. Add the following code, replacingloginwith your login name inEXTENSION_POINT_IDas usual:/** * Class that gathers extension data from the 'headControllers' extension point * and publishes this data using the singleton pattern. * @author msp */ public class HeadControllers { /** Identifier of the extension point */ public final static String EXTENSION_POINT_ID = "de.cau.cs.rtprak.login.simple.headControllers"; /** The singleton instance of the {@code HeadControllers} class */ public final static HeadControllers INSTANCE = new HeadControllers(); /** list of head controller ids with associated names. */ private List<String[]> controllerNames = new LinkedList<String[]>(); /** map of controller ids to their runtime instances. */ private Map<String, IHeadController> controllerMap = new HashMap<String, IHeadController>(); /** * Creates an instance of this class and gathers extension data. */ HeadControllers() { IConfigurationElement[] elements = Platform.getExtensionRegistry() .getConfigurationElementsFor(EXTENSION_POINT_ID); for (IConfigurationElement element : elements) { if ("controller".equals(element.getName())) { String id = element.getAttribute("id"); String name = element.getAttribute("name"); if (id != null && name != null) { try { IHeadController controller = (IHeadController)element .createExecutableExtension("class"); controllerNames.add(new String[] {id, name}); controllerMap.put(id, controller); } catch (CoreException exception) { StatusManager.getManager().handle(exception, Activator.PLUGIN_ID); } } } } } /** * Returns a list of controller ids and names. The arrays in the list are * all of size 2: the first element is an id, and the second element is the * associated name. The controller name is a user-friendly string to be * displayed in the UI. * @return a list of controller ids and names */ public List<String[]> getControllerNames() { return controllerNames; } /** * Returns the head controller instance for the given id. * @param id identifier of a head controller * @return the associated controller */ public IHeadController getController(final String id) { return controllerMap.get(id); } }
Adding Support for Head Controllers to the View
We will now have to add support for head controllers to our view.
- Open the
TapeViewPartclass and add the private fieldscheckedControllerActionof type IAction andcurrentControllerof typeIHeadController. Add a list of registered head controllers to the view's menu (which can be opened using the small white triangle) in the
createPartControl()method:IMenuManager menuManager = getViewSite().getActionBars().getMenuManager(); for (String[] controllerName : HeadControllers.INSTANCE.getControllerNames()) { final String id = controllerName[0]; String name = controllerName[1]; Action action = new Action(name, IAction.AS_RADIO_BUTTON) { public void run() { if (checkedControllerAction != null) { checkedControllerAction.setChecked(false); } this.setChecked(true); checkedControllerAction = this; currentController = HeadControllers.INSTANCE.getController(id); } }; if (checkedControllerAction == null) { action.run(); } menuManager.add(action); }Implement the following method in the
TuringTapeclass:public void execute(final IHeadController controller)
The method shall have the following properties:
- Determine the character at the current head position using
getCharacter(getHeadPosition()). - Call
controller.nextCommand()with the current character as parameter. - Depending on the action in the returned head command, either write the returned new character to the current position in text (
WRITE), or write the blank symbol (ERASE), or do nothing. If the current position exceeds the end of the text, append enough blank characters up to the current position, then append the new character. - Depending on the direction in the returned head command, either move the head to the left (but no further than position 0), or to the right, or do nothing.
- Determine the character at the current head position using
- Copy the files step.gif and reset.gif to the icons folder.
- Add an action to the toolbar of the Tape view with text
Stepand iconstep.pngwhich does the following:- Check whether the current head controller is not
null, than calltape.execute(currentController). - Refresh the table viewer with its
refresh()method. Note: actions don't need images, but only image descriptors. Thus, to set the action's icon to
step.png, you can use something like the following:Activator.imageDescriptorFromPlugin(Activator.PLUGIN_ID, "path_to_icon");
- Check whether the current head controller is not
- Add another action with text Reset and icon reset.png which does the following:
- Check whether the current head controller is not
null, then call thereset()method oncurrentController. - Set the current head position to 1.
- Refresh the table viewer with its
refresh()method.
- Check whether the current head controller is not
Adding a Test Head Controller
Before creating a proper head controller in another plug-in, we will add a test controller to check whether all this stuff works.
Add a new class
NullControllerto thede.cau.cs.rtprak.login.simple.controllerspackage:/** * Head controller that does nothing, for testing. * @author msp */ public class NullController implements IHeadController { /** * {@inheritDoc} */ public HeadCommand nextCommand(final char character) { return new HeadCommand(Action.NULL, Direction.NONE, '_'); } /** * {@inheritDoc} */ public void reset() { } }- Open the Plugin Manifest Editor and switch to the Extensions tab. Add your
de.cau.cs.rtprak.login.simple.headControllersextension point. Add acontrollerelement with IDde.cau.cs.rtprak.login.simple.nullController, nameNull Controller, and classde.cau.cs.rtprak.login.simple.controller.NullController. - Start the application and observe how your program behaves if you change the action and direction in the
NullControllerclass. You can actually change both while the application is running, but only if you have started it in the Debug mode. In that case, Eclipse will actually hot-swap your changes into the running application. Sorcery!
Implementing Your Own Head Controller
We will now create a new plug-in with a new head controller:
- Create a new plug-in
de.cau.cs.rtprak.login.simple.extension. (Remember to create the project in your Git repository.) In the Plugin Manifest Editor, addde.cau.cs.rtprak.login.simpleto the dependencies of the new plug-in. - Create a new class that implements
IHeadController:- Assuming that the initial head position is 1, the controller shall copy the input text infinitely often. So if the tape initially contains the word
hello, the controller shall generatehellohellohellohe.... - Your class needs some private fields to store the internal state of the controller, and you may need some special character as marker. Imagine how a Turing Machine would do this.
- It is not allowed to store data that can grow infinitely, since a Turing Machine may only have a finite number of states. This means that you may store single characters or numbers, but you must not store Strings, StringBuffers, arrays, lists, or sets.
- Assuming that the initial head position is 1, the controller shall copy the input text infinitely often. So if the tape initially contains the word
- Register the new controller class using an extension in the new plug-in.
- Test your controller.
Congratulations!
Congratulations, you just made a big step towards understanding how Eclipse works. Plus, you've refreshed your knowledge on Turing Machines along the way. ![]() Eclipse is an industry standard technology, and having experience programming against it is a valuable skill for you.
Eclipse is an industry standard technology, and having experience programming against it is a valuable skill for you.
If you have any comments and suggestions for improvement concerning this tutorial, please don't hesitate to tell us about them!