| Warning | ||
|---|---|---|
| ||
This tutorial isn't complete yet! |
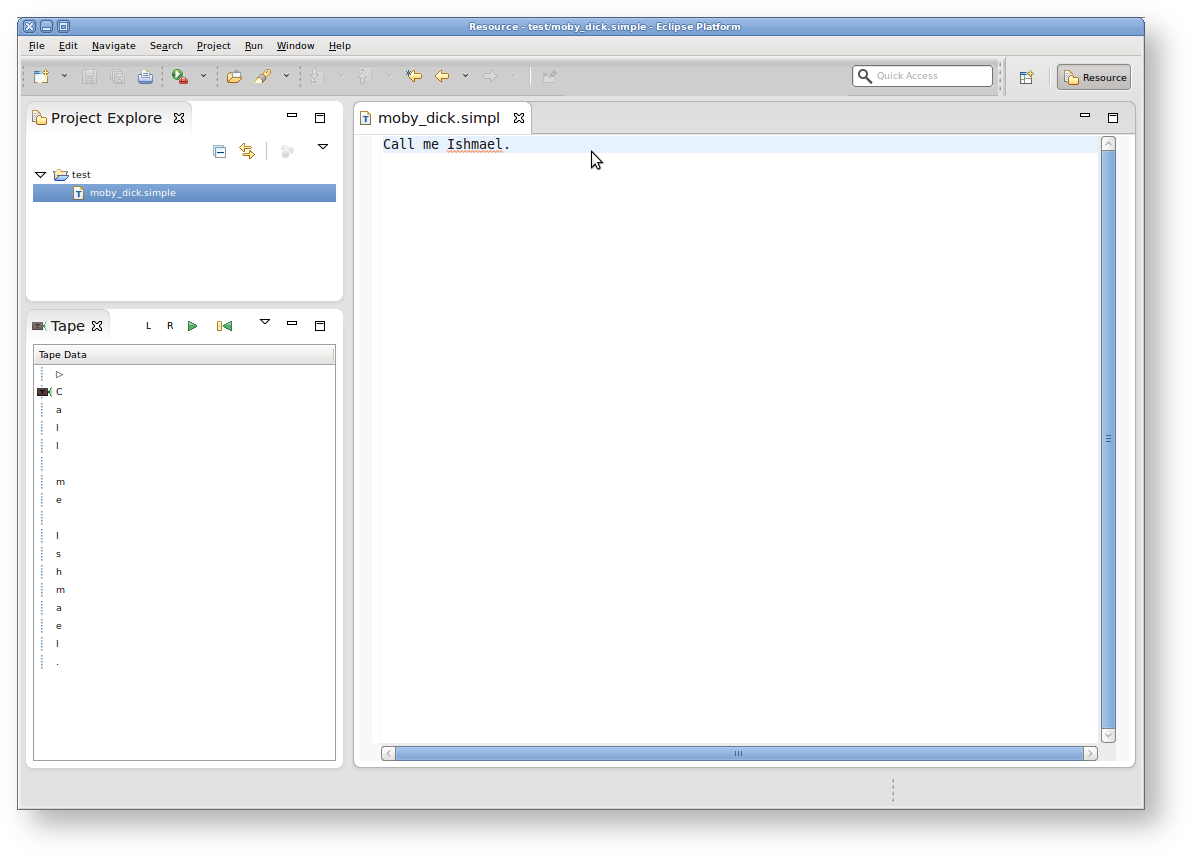
This tutorial will teach you the basics of writing plugins that run inside the Eclipse framework. You will learn about editors, views, and extension points by creating one of each yourself. Once you're done with this tutorial, you will have an application that will look something like this:
You may want to download the slides of the presentation explaining the basic concepts you will explore in this tutorial.
| Table of Contents |
|---|
Preliminaries
...
- Create a class
TapeViewPartin a new packagede.cau.cs.rtprak.login.simple.viewsthat extends the ViewPart class. (make sure that in the New Java Class wizard, the option Inherited abstract methods is checked.) - Add a private field
tableViewerof type TableViewer. Your
TableViewPartcontains a still empty methodcreatePartControl. This method will be responsible for creating the user interface components of your view. Add the following code to create the table we want to display:Code Block language java Table table = new Table(parent, SWT.BORDER); table.setHeaderVisible(true); TableColumn column = new TableColumn(table, SWT.NONE); column.setWidth(80); column.setText("Tape Data"); tableViewer = new TableViewer(table);
The
setFocusmethod controls what happens when your part gets the focus. Make sure the focus will then automatically be set to the table by adding the following code:Code Block tableViewer.getControl().setFocus();
...
Add the following methods to
SimpleEditorPart:Code Block language java /** * Returns the text that is currently displayed in the editor. * @return the currently displayed text */ public String getText() { return getDocumentProvider().getDocument(getEditorInput()).get(); } /** The listener that is currently registered for this editor. */ private IDocumentListener registeredListener; /** * Registers the given runnable as listener for changes to the text * of this editor. * @param runnable a runnable to register as text listener */ public void registerTextListener(final Runnable runnable) { registeredListener = new IDocumentListener() { public void documentAboutToBeChanged(DocumentEvent event) {} public void documentChanged(DocumentEvent event) { runnable.run(); } }; getDocumentProvider().getDocument(getEditorInput()) .addDocumentListener(registeredListener); } /** * Removes the last registered text listener. */ public void disposeTextListener() { if (registeredListener != null) { if (getDocumentProvider() != null) { getDocumentProvider().getDocument(getEditorInput()) .removeDocumentListener(registeredListener); } registeredListener = null; } }Add the following code to
TapeViewPart:Code Block language java /** The editor part that is currently set as input for the viewer. */ private SimpleEditorPart currentInput; /** * Sets the displayed text of the given editor part as input of the * viewer, if the editor part is a SimpleEditorPart. * @param part workbench part to set as input */ private void setInput(final IWorkbenchPart part) { if (part instanceof SimpleEditorPart && part != currentInput) { if (currentInput != null) { currentInput.disposeTextListener(); } currentInput = (SimpleEditorPart) part; Runnable runnable = new Runnable() { public void run() { tape.setText(new StringBuffer(currentInput.getText())); tableViewer.refresh(); } }; runnable.run(); currentInput.registerTextListener(runnable); } }Add the following code to
createPartControl():Code Block language java IWorkbenchWindow workbenchWindow = getSite().getWorkbenchWindow(); IWorkbenchPage activePage = workbenchWindow.getActivePage(); if (activePage != null) { setInput(activePage.getActivePart()); } workbenchWindow.getPartService().addPartListener(new IPartListener() { public void partActivated(final IWorkbenchPart part) { setInput(part); } public void partDeactivated(final IWorkbenchPart part) {} public void partBroughtToTop(final IWorkbenchPart part) {} public void partClosed(final IWorkbenchPart part) {} public void partOpened(final IWorkbenchPart part) {} });
...
Creating an Extension Point
WRITE THIS SECTION
For the final part of the tutorial, we will now use the extension point mechanism of Eclipse to add some behavior to our Turing Machines. An extension point is basically a well-defined point where other plug-ins can register to add functionality. The extension point is basically defined by an XML Schema file that defines an interface; other plug-ins may access this interface using XML code in their plugin.xml file, so-called extensions. Our extension point will provide an interface for classes that define behavior of a Turing Machine, and we will call them head controllers (programs that control the tape head).
Defining a Command Class
We will start by defining a class representing a command that will be passed to a selected head controller.
- Add a class
HeadCommandto the packagede.cau.cs.rtprak.login.simple.controller. - Add a nested public static enumeration
Actionwith valuesWRITE,ERASE, andNULL. - Add a nested public static enumeration
Directionwith valuesLEFT,RIGHT, andNONE. Add the following private fields:
Code Block language java private Action action; private Direction direction; private char newChar;- Add a constructor to initialize the fields.
- Add getter methods to access the fields.
Defining the Controller Interface
We will now define an interface that all head controllers will have to implement:
- Add an interface
IHeadControllerin the packagede.cau.cs.rtprak.login.simple.controller. Add the following methods to the interface:
Code Block language java /** * Calculate the next command depending on the currently seen character. * @param character the currently seen character * @return the next command specifying which character to write and * which direction to move the head */ HeadCommand nextCommand(char character); /** * Reset the internal state of the head controller. */ void reset();
Defining the Extension Point
We will now define the extension point that head controllers will be registered at.
- Open the
plugin.xmlfile in the Plugin Manifest Editor and switch to the Extension Points tab. - Click the Add button and enter
de.cau.cs.rtprak.login.simple.headControllersas the extension point's ID, andHead Controllersas its name. Shorten the schema file's file name toschema/headControllers.exsd. Make sure that Edit extension point schema when done is checked and click Finish. - Eclipse will now have opened the new schema file in the Extension Point Schema Editor, a graphical editor similar to the Plugin Manifest Editor that provides a way to define things that might be easier than directly editing the text files.
- In the new editor, open the Definition tab.
- Add a new element named
controller. - Add three new attributes to the
controllerelement:- First attribute: name
id, userequired, typestring, translatablefalse. - Second attribute: name
name, userequired, typestring, translatabletrue. - Third attribute: name
class, userequired, typejava, implementsde.cau.cs.rtprak.login.simple.controller.IHeadController. This is the attribute that will tell us which Java class actually implements the controller that is to be registered at our extension point. To make sure that we know how to speak to the class, we require it to implement the interface we defined for head controllers.
- First attribute: name
- Add a sequence to the
extensionelement. Right-click the sequence and click New -> controller. Set the Min Occurrences of the sequence to 0, and set Max Occurrences to be Unbounded. - Save the editor and switch back to the Plugin Manifest Editor.
- On the Runtime tab, add
de.cau.cs.rtprak.login.simple.controllerto the list of packages exported by the plug-in. This is necessary because plug-ins that want to provide extensions for the extension point must provide a class that implementsIHeadController. For this to work, those plug-ins must have access to that interface; thus, we have to export the package containing it.
Accessing the Extension Point
We will now add a class that will be in charge of loading all extensions registered at our new extension point.
Add a class
HeadControllersto the packagede.cau.cs.rtprak.login.simple.controller. Add the following code, replacingloginwith your login name inEXTENSION_POINT_IDas usual:Code Block language java /** * Class that gathers extension data from the 'headControllers' extension point * and publishes this data using the singleton pattern. * @author msp */ public class HeadControllers { /** Identifier of the extension point */ public final static String EXTENSION_POINT_ID = "de.cau.cs.rtprak.login.simple.headControllers"; /** The singleton instance of the {@code HeadControllers} class */ public final static HeadControllers INSTANCE = new HeadControllers(); /** list of head controller ids with associated names. */ private List<String[]> controllerNames = new LinkedList<String[]>(); /** map of controller ids to their runtime instances. */ private Map<String, IHeadController> controllerMap = new HashMap<String, IHeadController>(); /** * Creates an instance of this class and gathers extension data. */ HeadControllers() { IConfigurationElement[] elements = Platform.getExtensionRegistry() .getConfigurationElementsFor(EXTENSION_POINT_ID); for (IConfigurationElement element : elements) { if ("controller".equals(element.getName())) { String id = element.getAttribute("id"); String name = element.getAttribute("name"); if (id != null && name != null) { try { IHeadController controller = (IHeadController)element .createExecutableExtension("class"); controllerNames.add(new String[] {id, name}); controllerMap.put(id, controller); } catch (CoreException exception) { StatusManager.getManager().handle(exception, Activator.PLUGIN_ID); } } } } } /** * Returns a list of controller ids and names. The arrays in the list are * all of size 2: the first element is an id, and the second element is the * associated name. The controller name is a user-friendly string to be * displayed in the UI. * @return a list of controller ids and names */ public List<String[]> getControllerNames() { return controllerNames; } /** * Returns the head controller instance for the given id. * @param id identifier of a head controller * @return the associated controller */ public IHeadController getController(final String id) { return controllerMap.get(id); } }
Adding Support for Head Controllers to the View
We will now have to add support for head controllers to our view.
- Open the
TapeViewPartclass and add the private fieldscheckedControllerActionof type IAction andcurrentControllerof typeIHeadController. Add a list of registered head controllers to the view's menu (which can be opened using the small white triangle) in the
createPartControl()method:Code Block language java IMenuManager menuManager = getViewSite().getActionBars().getMenuManager(); for (String[] controllerName : HeadControllers.INSTANCE.getControllerNames()) { final String id = controllerName[0]; String name = controllerName[1]; Action action = new Action(name, IAction.AS_RADIO_BUTTON) { public void run() { if (checkedControllerAction != null) { checkedControllerAction.setChecked(false); } this.setChecked(true); checkedControllerAction = this; currentController = HeadControllers.INSTANCE.getController(id); } }; if (checkedControllerAction == null) { action.run(); } menuManager.add(action); }Implement the following method in the
TuringTapeclass:Code Block language java public void execute(final IHeadController controller)The method shall have the following properties:
- Determine the character at the current head position using
getCharacter(getHeadPosition()). - Call
controller.nextCommand()with the current character as parameter. - Depending on the action in the returned head command, either write the returned new character to the current position in text (
WRITE), or write the blank symbol (ERASE), or do nothing. If the current position exceeds the end of the text, append enough blank characters up to the current position, then append the new character. - Depending on the direction in the returned head command, either move the head to the left (but no further than position 0), or to the right, or do nothing.
- Determine the character at the current head position using
- Copy the files step.gif and reset.gif to the icons folder.
- Add an action to the toolbar of the Tape view with text
Stepand iconstep.pngwhich does the following:- Check whether the current head controller is not
null, than calltape.execute(currentController). - Refresh the table viewer with its
refresh()method. Note: actions don't need images, but only image descriptors. Thus, to set the action's icon to
step.png, you can use something like the following:Code Block language java Activator.imageDescriptorFromPlugin(Activator.PLUGIN_ID, "path_to_icon");
- Check whether the current head controller is not
- Add another action with text Reset and icon reset.png which does the following:
- Check whether the current head controller is not
null, then call thereset()method oncurrentController. - Set the current head position to 1.
- Refresh the table viewer with its
refresh()method.
- Check whether the current head controller is not
Adding a Test Head Controller
Before creating a proper head controller in another plug-in, we will add a test controller to check whether all this stuff works.
Add a new class
NullControllerto thede.cau.cs.rtprak.login.simple.controllerspackage:Code Block language java /** * Head controller that does nothing, for testing. * @author msp */ public class NullController implements IHeadController { /** * {@inheritDoc} */ public HeadCommand nextCommand(final char character) { return new HeadCommand(Action.NULL, Direction.NONE, '_'); } /** * {@inheritDoc} */ public void reset() { } }- Open the Plugin Manifest Editor and switch to the Extensions tab. Add your
de.cau.cs.rtprak.login.simple.headControllersextension point. Add acontrollerelement with IDde.cau.cs.rtprak.login.simple.nullController, nameNull Controller, and classde.cau.cs.rtprak.login.simple.controller.NullController. - Start the application and observe how your program behaves if you change the action and direction in the
NullControllerclass. You can actually change both while the application is running, but only if you have started it in the Debug mode. In that case, Eclipse will actually hot-swap your changes into the running application. Sorcery!
Implementing Your Own Head Controller
We will now create a new plug-in with a new head controller:
- Create a new plug-in
de.cau.cs.rtprak.login.simple.extension. (Remember to create the project in your Git repository.) In the Plugin Manifest Editor, addde.cau.cs.rtprak.login.simpleto the dependencies of the new plug-in. - Create a new class that implements
IHeadController:- Assuming that the initial head position is 1, the controller shall copy the input text infinitely often. So if the tape initially contains the word
hello, the controller shall generatehellohellohellohe.... - Your class needs some private fields to store the internal state of the controller, and you may need some special character as marker. Imagine how a Turing Machine would do this.
- It is not allowed to store data that can grow infinitely, since a Turing Machine may only have a finite number of states. This means that you may store single characters or numbers, but you must not store Strings, StringBuffers, arrays, lists, or sets.
- Assuming that the initial head position is 1, the controller shall copy the input text infinitely often. So if the tape initially contains the word
- Register the new controller class using an extension in the new plug-in.
- Test your controller.
Congratulations!
Congratulations, you just made a big step towards understanding how Eclipse works. Plus, you've refreshed your knowledge on Turing Machines along the way. ![]() Eclipse is an industry standard technology, and having experience programming against it is a valuable skill for you.
Eclipse is an industry standard technology, and having experience programming against it is a valuable skill for you.
If you have any comments and suggestions for improvement concerning this tutorial, please don't hesitate to tell us about them!