Welcome to this tutorial! We will walk you through the process of starting Eclipse for the first time, importing existing plug-ins, and creating a simple plugin yourself.
Preliminaries
There's a few things to do before we dive into the tutorial itself. For example, to do Eclipse programming, you will have to get your hands on an Eclipse installation first. Read through the following sections to get ready for the tutorial tasks.
Required Software
Install Eclipse. For what we do, we recommend installing the Eclipse Modeling Tools.
Finding Documentation
During the tutorial, we will cover each topic only briefly, so it is always a good idea to find more information online. Here's some more resources that may prove helpful: You will find that despite of all of these resources Eclipse is still not as well commented and documented as we'd like it to be. Finding out how stuff works in the world of Eclipse can thus sometimes be a challenge. However, you are not alone: this also applies to many people who are conveniently connected by something called The Internet. It should go without saying that if all else fails, Google often turns up great tutorials or solutions to problems you may run into. And if it doesn't, your advisers will be happy to help. As far as KIELER documentation is concerned, you will find documentation at the KIELER Confluence. The documentation is not as complete as we (and especially everyone else) would like it to be, however, so feel free to ask those responsible for help if you have questions that the documentation fails to answer.
As Java programmers, you will already know this one, but it's so important and helpful that it's worth repeating. The API documentation contains just about everything you need to know about the API provided by Java.
Eclipse comes with its own help system that contains a wealth of information. You will be spending most of your time in the Platform Plug-in Developer Guide, which contains the following three important sections:
When you encounter a new topic, such as SWT or JFace, the Programmer's Guide often contains helpful articles to give you a first overview. Recommended reading.
One of the two most important parts of the Eclipse Help System, the API Reference contains the Javadoc documentation of all Eclipse framework classes. Extremely helpful.
The other of the two most important parts of the Eclipse Help System, the Extension Point Reference lists all extension points of the Eclipse framework along with information about what they are and how to use them. Also extremely helpful.
The official Eclipse Wiki. Contains a wealth of information on Eclipse programming.
Provides forums, tutorials, articles, presentations, etc. on Eclipse and Eclipse-related topics.![]()
![]()
Documentation on how the layout infrastructure works and on how to write your own layout algorithms. This is our project, so if you find that something is unclear or missing, tell us about it!
First Steps with Eclipse
Starting Eclipse
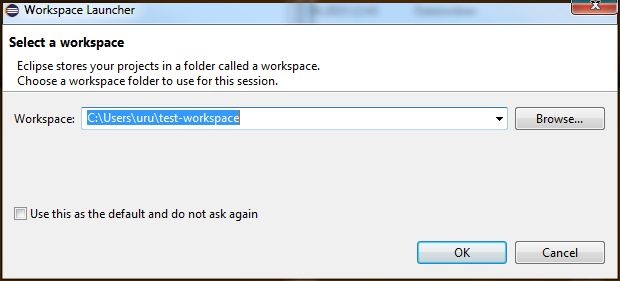
- Eclipse uses workspaces to store, for instance, user preferences. Upon the first start of Eclipse you will be asked to specify a location. Select one as you like.
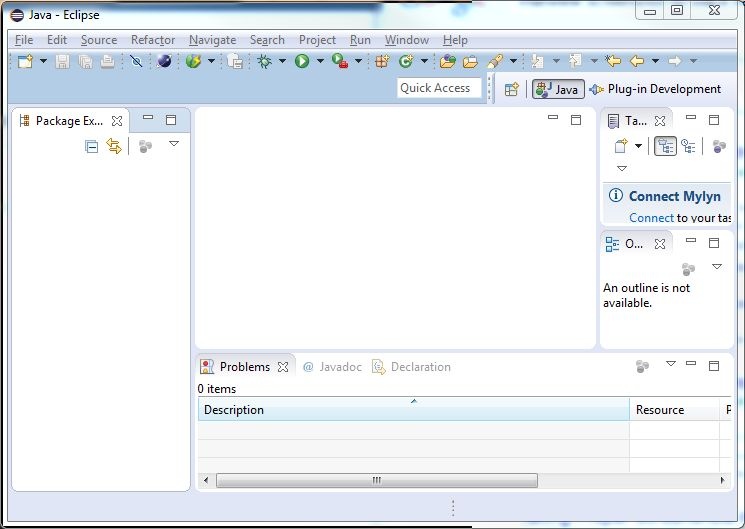
- Switch to the workbench, you should see something like this
Importing Existing Plug-ins
- Download the zip file with an example plug-in from our Stash. Unzip the file.
- Open the context menu within the Package-Explorer (on the very left, right-click the empty space).
- Select Import. Then chose General > Existing Projects into Workspace.
- Browse to the location where you unzipped the downloaded plug-in. Click open. Check the checkbox in front of the
de.cau.cs.kieler.tutorials.plugins.shouterplug-in and press Finish.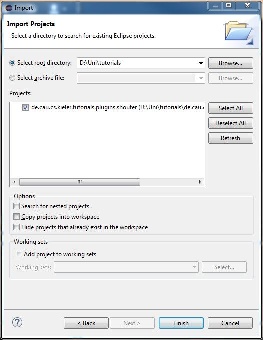
Running Eclipse
In Eclipse, we develop plug-ins that extend the basic functionality of Eclipse itself. As we do not always want to run Eclipse with all the functionality there is, we can use Run Configurations to precisely specify the functionality we want.
- Click Run > Run Configurations...
- Right-click Eclipse Application and click New. Set the configuration's name to
Eclipse Test. - On the Plug-ins tab, set Launch with to plug-ins selected below only.
- Click Deselect All.
- Check the Workspace item in the tree.
- Check the
org.eclipse.ui.ide.applicationplugins under Target Platform - Click Add Required Plug-ins. Press it twice (just to be sure!).
- Click Apply to save your changes and then Run to start an Eclipse instance to test with.
- In the newly started Eclipse, open the context menu of the Project Explorer.
- You should see a Hello Shouter entry which shouts out Hello if you press it.
Note that you can run your configuration also by using the debug button in the main menu. In that case you will be able to use debug features and code changes will be directly active in your Eclipse instance after saving. In the rather rare cases where this is impossible you will be notified.
Creating Your First Plug-in
- Open the context menu within the Package-Explorer (on the very left, right-click the empty space).
- New -> Project...
- In the project wizard, choose Plug-in Project and click Next.
- As the project name, enter
de.cau.cs.kieler.tutorials.myshouter. Click Next. - As the name, enter
Simple Shouter. Uncheck all checkboxes. Click Finish. (Eclipse might ask you whether you want to switch to the Plug-in Development Perspective, which configures Eclipse to provide the views that are important for plug-in development. Choose Yes. Or No. It won't have a big influence on your future...) - Eclipse has now created your new plug-in and was nice enough to open the Plug-in Manifest Editor, which allows you to graphically edit two important files of your plugin:
plugin.xml(which has not been created yet) andMETA-INF/MANIFEST.MF. Basically, those two files provide information that tell Eclipse what other plug-ins your plug-in needs and how it works together with other plug-ins by providing extensions and extension points. Our new plug-in will depend on the previously imported plug-in, so switch to the Dependencies tab of the editor and add a dependency tode.cau.cs.kieler.tutorials.plugins.shouter. Save the editor and close it. (You can always reopen it by opening one of the two mentioned files from the Package Explorer.)
Extending Functionality
We will now use the extension point mechanism of Eclipse to add some behavior to the de.cau.cs.kieler.tutorials.plugins.shouter plugin. An extension point is basically a well-defined point where other plug-ins can register to add functionality. The extension point is basically defined by an XML Schema file that defines an interface; other plug-ins may access this interface using XML code in their plugin.xml file, so-called extensions.
The de.cau.cs.kieler.tutorials.plugins.shouter plug-in defines such an extension point to register Shouters. A shouter is a Java class that implements the following interface.
public interface IShouter {
    String getShoutString();
}
- In your previously created plugin (
de.cau.cs.kieler.tutorials.myshouter) create a new classMyShouterthat implements theIShouterinterface.- From the Package Explorer context menu select New > Class.
- Open the
MANIFEST.MFof your plugin and navigate to the Extensions tab. - Press Add and select the
de.cau.cs.kieler.tutorials.plugins.shoutersextension point. Press Finish.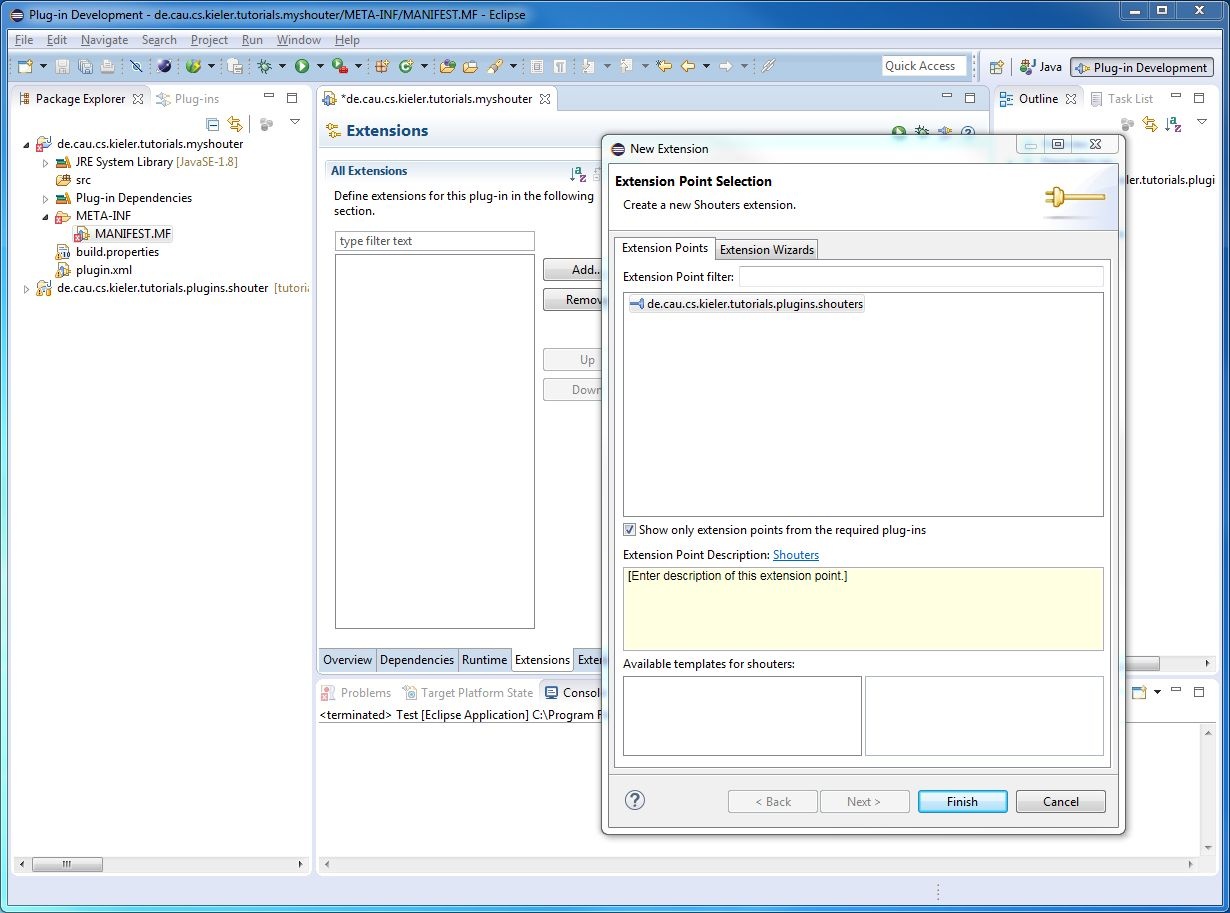
- Give it a name and using the Browse button select your previously created class implementing the
IShouterinterface. - Start your Eclipse instance again using the created run configuration and test your very own shouter.