This tutorial presents the Xtext framework, a toolsuite for the generation of plain text based model editors. Such textual editors provide syntax highlighting, content assist (ctrl-space), an outline, and much more out-of-the-box. You will start by creating a textual syntax for Turing Machines.
Preliminaries
There's a few things to do before we dive into the tutorial itself.
Required Software
For this tutorial, we need you to have Eclipse installed:
- Install Eclipse. For what we do, we recommend installing the Eclipse Modeling Tools, with a few extras. Our Wiki page on getting Eclipse has the details: simply follow the instructions for downloading and installing Eclipse and you should be set.
- Open your eclipse instance and install the complete Xtext SDK 2.7.3 from the itemis updatesite: http://download.itemis.de/updates/
Recommended Tutorials
We recommend that you have completed the following tutorials before diving into this one.
- Eclipse Plug-ins and Extension Points
- Eclipse Modeling Framework (EMF)
- This tutorial needs the turingmachine.ecore and the controller you've implemented in the EMF tutorial. If you did not complete the EMF tutorial, you may download a working turing machine metamodel in the next subsection.
Setting Up Your Workspace
If you have already completed the Eclipse Modeling Framework (EMF) tutorial and created your own turing machine metamodel, you are encouraged to use it to perform this tutorial. If you did not (or if you want to start from scratch) feel free to follow the steps of this section to retrieve a working metamodel.
- Download the zip file with all our prepared tutorial plugins from our Stash. Unzip the file.
- Open the context menu within the Package-Explorer (on the very left, right-click the empty space).
- Select Import. Then chose General > Existing Projects into Workspace.
- Browse to the location where you unzipped the downloaded plug-ins. Check the check box in front of all the
de.cau.cs.kieler.tutorials.klighd.*projects and press Finish.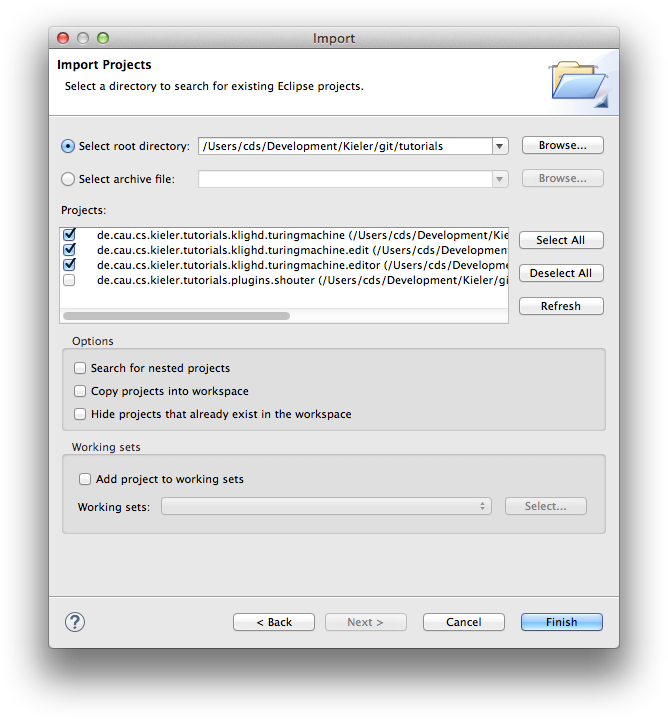
The imported projects contain a meta model for Turing machines. (You may notice that this tutorial thus also slips in a perfect opportunity to brush up on your knowledge of Turing machines. Consider it a public service and thank us later.) It does not model the tape or the head, only its states and transitions. It is these Turing machines that we will develop a visualization for over the course of this tutorial.
Creating a Grammar
An Xtext grammar is always related to a specific EMF meta model. The grammar defines a concrete syntax in which instances of the meta model (the abstract syntax) can be serialized and stored. Xtext supports two ways of linking a grammar with a meta model: either creating a grammar for an existing meta model, or creating a grammar first and generating a meta model out of it. Here we will use the former approach, reusing the meta model for Turing Machines that you already defined earlier.
- File → New → Project... → Xtext → Xtext Project From Existing Meta Models → Next → Add... → turing.genmodel → OK
- Select your top-level model element as "Entry rule", e.g. TuringMachine → Next → enter the following values:
- Project name: de.cau.cs.rtprak.login.turing.text (like in previous tutorials, replace "login" by your login name)
- Location: your repository path
- Name: de.cau.cs.rtprak.login.turing.text.Turing
- Extensions: tuxt (the file extension under which your text files will be stored)
- Uncheck Create SDK feature project (not required)
- Finish → an editor is opened with a predefined grammar (Turing.xtext). The fourth line should contain an import statement followed by the namespace URI of your meta model, which is probably marked with an error. The problem here is that the meta model is not loaded in the Eclipse instance you are using for development. Fix this problem by replacing the URI by the workspace path of your Turing Machines ecore model, e.g.
"platform:/resource/de.cau.cs.rtprak.login.turingmodel/model/turing.ecore" - The Turing.xtext file is located in the package de.cau.cs.rtprak.login.turing.text together with a Modeling Workflow Engine file, which can be used to configure code generation. Right-click GenerateTuring.mwe2 and select Run As → MWE2 Workflow. If you get an error message like "*ATTENTION* It is recommended to use the ANTLR 3 parser generator" in the console, type n and install Antlr from the update site.
- Now a great amount of Java code should have been generated. Add the new plugins to your Eclipse run configuration and start it.
- In the new Eclipse instance: File → New → File and name it test.tuxt (when asked to add the Xtext nature, hit Yes).
Use ctrl + space for getting content assist to create a valid model following the predefined grammar. The syntax will probably look similar to this:
TuringMachine {
    states {
        State blub {
        },
        State blah {
            outgoing {
                Transition {
                    target blub
                }
            }
        }
    }
}
The predefined grammar is not very nice. That's why now your creative part comes into play. Change the Xtext grammar file to a grammar of your liking, which should support a simple and readable syntax for Turing Machines. All required documentation for this task is found at http://www.eclipse.org/Xtext/.
Some hints:
- The predefined grammar contains one grammar rule for each meta model class. This general structure can be kept in most cases.
- Ecore enumerations (EEnum) must be defined with an
enumgrammar rule (see documentation). This is not correct in the predefined grammar and is marked with a TODO note. - At some points you will need to reference other elements, which need to have some kind of identifier string in order to do this. If those elements do not have a string attribute yet, you need to modify the meta model and add such an attribute.
- There are some predefined terminal rules that can be reused and are already imported in the grammar file. Click on
org.eclipse.xtext.common.Terminalsat the top of the document and hit F3 to see those terminal definitions.
Test the new grammar by re-generating the code (after the first time, the GenerateTuring workflow should be available in the run configurations menu) and starting a test instance of Eclipse. Use your newly designed textual syntax for writing a Turing Machine that copies the input word infinitely often.
Formatting
Xtext supports automatic formatting, which is available in the text editor with right-click → Format or ctrl+shift+F. However, the formatter must be configured in order to generate good results. Write a formatter configuration that fits well to your syntax by editing the generated file TuringFormatter in the formatting subpackage. Learn how this is done by reading the Xtext reference documentation → Runtime Concepts → Formatting.
Validation
The generated code includes some automatic validation of models with respect to syntactic issues. If the token sequence in a text file does not conform to the grammar, error markers are shown at appropriate points in the text. However, this should be augmented by semantic validation by checking high-level properties of the model. Implement such a semantic validation by editing the generated file TuringJavaValidator in the validation subpackage. Learn how this is done by reading the Xtext reference documentation →Runtime Concepts → Validation → Custom Validation. You should implement at least the following checks:
- Is there exactly one initial state?
- Are all states reachable through transitions starting from the initial state?
Parsing
The generated code includes a parser for text files in your syntax. This parser is simply used with the same interface as for any other EMF models: resource sets (see the Xtext reference documentation → Integration with EMF and Other EMF Editors). Your final task for this tutorial is to reuse the Turing controller you implemented in the EMF tutorial for simulating Turing Machine models, this time applying it to .tuxt text files. However, instead of using a fixed path to your model file, we will now use a menu contribution in order to set the file path dynamically. This contribution will be put into the popup menu of the Navigator / Project Explorer view by configuring a visibility expression that tests the currently selected (right-clicked) elements. The contribution shall only be visible if the selected files have the extension tuxt, which is assigned to our mighty textual syntax.
- Go to the plugin where you created and registered
TuringHeadController, the Turing Machine simulator. Openplugin.xml→ Dependencies and add org.eclipse.ui if not on the list yet. Go to Extensions and add org.eclipse.ui.menus. - Add a menuContribution element to the new extension and set "popup:org.eclipse.ui.popup.any?after=additions" as locationURI (without quotation marks).
- Add a command element to the menuContribution with the following attributes:
- commandId: de.cau.cs.rtprak.login.setSimFile
- label: Set Simulation File
- Add a visibleWhen element to the command, and add an iterate element to the visibleWhen with the following attributes:
- operator: and
- ifEmpty: false
- Add an adapt element to the iterate with the following attribute:
- type: org.eclipse.core.resources.IResource
- Add a test element to the adapt with the following attributes:
- property: org.eclipse.core.resources.extension
- value: tuxt
- Add a new extension org.eclipse.ui.commands and add a command element to it with the following attributes:
- id: de.cau.cs.rtprak.login.setSimFile
- name: Set Simulation File
- Click on defaultHandler to open a dialog for creation of a new handler class. Name the new class
SetFileHandlerand put it into some package of that plugin. Remove the suggested interface and setorg.eclipse.core.commands.AbstractHandleras superclass instead.
Use the following method stub for
SetFileHandler(this requires a plugin dependency to org.eclipse.core.resources):/** * {@inheritDoc} */ @Override public Object execute(ExecutionEvent event) throws ExecutionException { ISelection selection = HandlerUtil.getCurrentSelection(event); if (selection instanceof IStructuredSelection) { Object element = ((IStructuredSelection) selection).getFirstElement(); if (element instanceof IFile) { IFile file = (IFile) element; // TODO update the static reference to the simulation file } } return null; }- Add a public static field named
modelFiletoTuringHeadControllerand directly set that field in the TODO part of theexecutemethod shown above. - Use the resource set code shown in the EMF tutorial for loading model files (without the stand-alone part) in order to load the
modelFilein theinitializemethod. - Now you should be able to simulate models written in your textual syntax: start Eclipse, right-click a textual Turing Machine file (*.tuxt), select Set Simulation File, and run simulation in your Tape view using the correct controller.
This tutorial was originally created by Christoph Daniel Schulze and Miro Spönemann for the Eclipse Project WT 12/13.