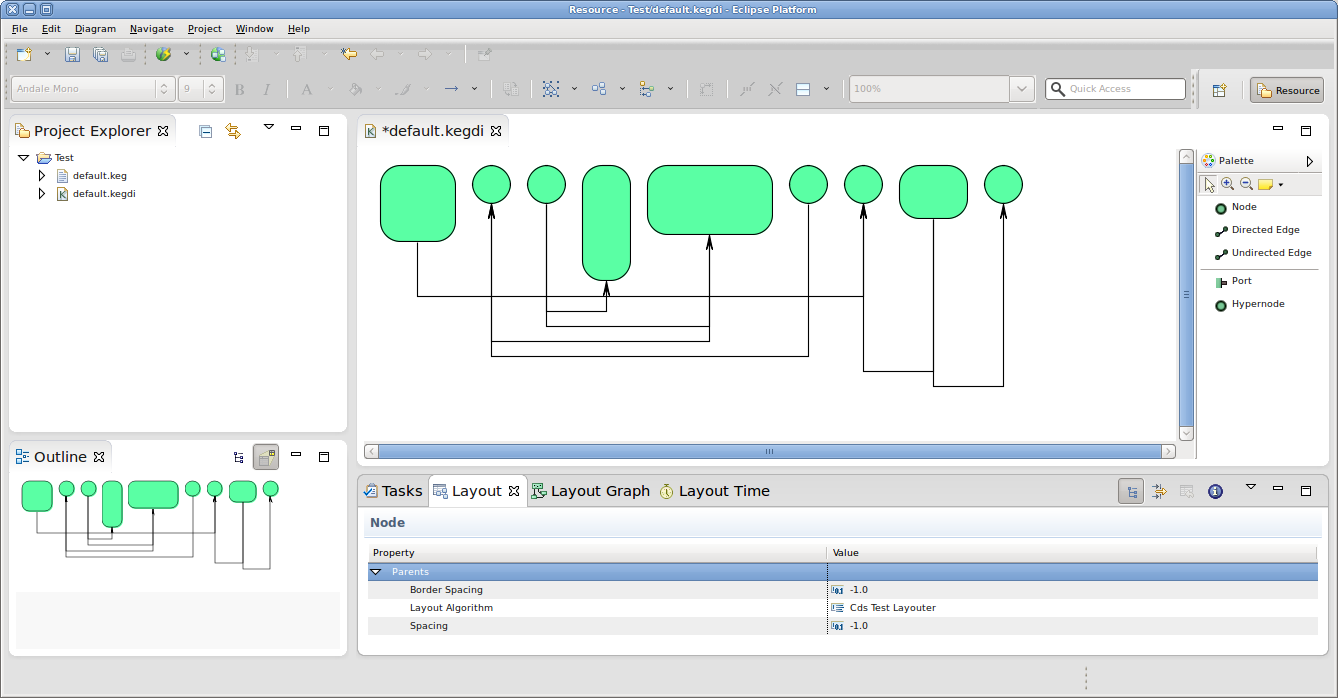
This exercise will introduce the usage of the Eclipse Plugin Development Environment for developing new layout algorithms to be used in Eclipse diagram editors. Replace each <login> by Welcome to the second tutorial! We will work our way through installing a proper Eclipse setup and developing a first very basic layout algorithm. The layout algorithm will integrate with KIML (KIELER Infrastructure for Meta-Layout), our very own framework that connects graphical editors with layout algorithms. Once you're finished, you should be able to create new Eclipse plug-ins and know how to write layout algorithms for KIML. And you should have a running Eclipse-based application that should look something like this:
| Table of Contents |
|---|
Preliminaries
There's a few things to do before we dive into the tutorial itself. For example, to do Eclipse programming, you will have to get your hands on an Eclipse installation first. Read through the following sections to get ready for the tutorial tasks.
Required Software
For this tutorial, we need you to have Eclipse and Git installed:
- Install Eclipse. For what we do, we recommend installing the Eclipse Modeling Tools, with a few extras. Our Wiki page on getting Eclipse has the details: simply follow the instructions for downloading and installing Eclipse and you should be set.
- You should already have obtained a working Git installation for the first tutorial.
General Remarks
Over the course of this tutorial, you will be writing a bit of code. Here's a few rules we ask you to follow:
- All the Java code you write as part of tutorials should be in packages with the prefix
de.cau.cs.rtprak.login.tutorialN, whereloginis your login name as used for your email address at the institute. This rule will apply to all tutorials – once we start with the actual practical projects, we will choose more meaningful package name. - All Java classes, fields, and methods should be thoroughly documented with the standard Javadoc comment format. Javadoc comments are well supported by Eclipse through code completion, syntax highlighting, and further features that help you. The code inside your methods should also be well commented. Try to think about what kinds of information would help someone unfamiliar with your code understand it.
- During this tutorial, we will be using Git mostly from the command line instead of using Eclipse's built-in Git support. This is because we've found Eclipse's Git support to be too unstable and buggy for us to trust it completely.
Finding Documentation
During the tutorial, we will cover each topic only briefly, so it is always a good idea to find more information online. Here's some more resources that will prove helpful:
- Java Platform, Standard Edition 6 API Specification
As Java programmers, you will already know this one, but it's so important and helpful that it's worth repeating. The API documentation contains just about everything you need to know about the API provided by Java6. - Eclipse Help System
Eclipse comes with its own help system that contains a wealth of information. You will be spending most of your time in the Platform Plug-in Developer Guide, which contains the following three important sections:- Programmer's Guide
When you encounter a new topic, such as SWT or JFace, the Programmer's Guide often contains helpful articles to give you a first overview. Recommended reading. - References -> API Reference
One of the two most important parts of the Eclipse Help System, the API Reference contains the Javadoc documentation of all Eclipse framework classes. Extremely helpful. - References -> Extension Points Reference
The other of the two most important parts of the Eclipse Help System, the Extension Point Reference lists all extension points of the Eclipse framework along with information about what they are and how to use them. Also extremely helpful.
- Programmer's Guide
- Eclipsepedia
The official Eclipse Wiki. Contains a wealth of information on Eclipse programming. - Eclipse Resources
Provides forums, tutorials, articles, presentations, etc. on Eclipse and Eclipse-related topics.
You will find that despite of all of these resources Eclipse is still not as well commented and documented as we'd like it to be. Finding out how stuff works in the world of Eclipse can thus sometimes be a challenge. However, this does not only apply to you, but also to many people who are conveniently connected by something called The Internet. It should go without saying that if all else fails, Google often turns up great tutorials or solutions to problems you may run into. And if it doesn't, Miro and I will be happy to help you as well.
As far as KIML and layout algorithms are concerned, you can always refer to our Wiki which has a section about KIML and the KIELER layout projects. The documentation is not complete, however, so feel free to ask Miro or Christoph Daniel for help if you have questions that the documentation fails to answer.
Preparing the Repository
We have created a Git repository for everyone to do his tutorials in. You can access the repository online through our Stash tool over here. Clone that repository:
- Open a console window and navigate to an empty directory that the repository should be placed in.
- Enter the command
git clone ssh://git@git.rtsys.informatik.uni-kiel.de:7999/PRAK/13ss-layout-tutorials.git .(including the final dot, which tells git to clone the repository into the current directory instead of a subdirectory) - You should now have a clone of the repository in the current directory.
You will use this repository for all your tutorial work, along with everyone else. To make sure that you don't interfere with each other, everyone will work on a different branch. This is not exactly how people usually use Git, but goes to demonstrate Git's flexibility... Add a branch for you to work in:
- Enter
git checkout -b login_name
You have just added and checked out a new branch. Everything you commit will go to this branch. To push your local commits to the server (which you will need to do so we can access your results), do the following:
- Enter
git push origin login_name
You would usually have to enter git pull first, but since nobody will mess with your branch anyway this won't be necessary. By the way, you only need to mention origin login_name with the first git push, since Git doesn't know where to push the branch yet. After the first time, Git remembers the information and it will be enough to just enter git push.
Finding the KIML Sources
If you want to develop a layout algorithm using KIML, you will have to get your hands at the KIML source code first. Of course, the code is available through a Git repository.
- Open a console window and navigate to an empty directory that the repository should be placed in.
- Enter the command
git clone ssh://git@git.rtsys.informatik.uni-kiel.de:7999/KIELER/pragmatics.git . - You should now have a clone of the repository in the current directory.
KIML is implemented as an Eclipse plug-in that you will have to import into your Eclipse workspace. We won't do this now; it will be one of the first steps in the development of your layout algorithm.
Developing Your First Layout Algorithm
Now that the preliminaries are out of the way, it's time to develop your first layout algorithm! It will, however, be a very simple one. This tutorial focuses on creating Eclipse plug-ins and on learning how to develop with KIML; thinking of and implementing cool layout algorithms is what the rest of the practical will focus on, and that is where the fun will be had!
| Note |
|---|
Remember to replace each occurrence of |
...
|
...
each occurrence of |
...
(e.g. |
...
|
Setting Up Your Workspace
You will start by importing the plug-ins necessary to program with KIML.
- Start Eclipse and create a new workspace.
- Setup your workspace as explained in this guide.
- We will now make the two local clones of our Git repositories known to Eclipse. To that end, open the Git Repository Exploring perspective through Window -> Open Perspective -> Other.
- Click on Add an existing local Git repository and choose the location of the tutorial repository. Note that when you open the repository entry, the branch you previously checked out is marked as the current branch under Branches -> Local.
- Add the KIML repository.
- We will now import the projects required for KIML development to your workspace. Right-click on the KIML repository and choose Import Projects.
- Choose Import existing projects, and select the plugins folder from the Working Directory. Then click Next.
- Import the following plug-ins. This consitutes a basic configuration for the development of layout algorithms.
- de.cau.cs.kieler.core
- de.cau.cs.kieler.core.kgraph
- de.cau.cs.kieler.kiml
- de.cau.cs.kieler.kiml.gmf
- de.cau.cs.kieler.kiml.service
- de.cau.cs.kieler.kiml.ui
- de.cau.cs.kieler.klay.layered
- To actually test your layout algorithms, you will need some kind of simple graph editor. The following plug-ins will add our KEG editor to your installation, which is just that.
- de.cau.cs.kieler.core.annotations
- de.cau.cs.kieler.core.kgraph.edit
- de.cau.cs.kieler.core.kivi
- de.cau.cs.kieler.core.uimodel
- de.cau.cs.kieler.core.model.keggmf
- de.cau.cs.kieler.kegcore.diagramui
- de.cau.cs.kieler.kiml.layoutkarma
- de.cau.cs.kieler.keg
- de.cau.cs.kieler.kimlkeg.uidiagram
- de.cau.cs.kieler.kimlkeg.diagram.viewercustom
- de.cau.cs.kieler.klay.layered
File -> New -- keg.edit
Adding a New Plug-in
We need to create a new plug-in to implement the layout algorithm in. Switch back to the Java or Plug-in Development perspective and follow these steps:
- Click File > New > Other... - > Plug-in Development - > Plug-in ProjectProject name: de.
- Enter
de.cau.cs.rtprak.login_name.tutorial2as the project name. Uncheck Use default location and usetutorial_repository_path/de.cau.cs.rtprak.<login>.exercise1Next -> set version to.login_name.tutorial2as the location. Click Next. - Set the version to
0.1.0.qualifier, provider to vendor toChristian-Albrechts-Universität zu Kiel, and execution environment to to J2SE-1.5 . (do this for all plugins plug-ins that you create!) - The Uncheck all checkboxes in the Options group can be deactivated -> Finish
- Check in the new plugin project into https://rtsys.informatik.uni-kiel.de/svn/teaching/prak/10ss-layout/exercises/<login>/
- Activate Checkstyle: right-click the project -> Properties -> Checkstyle -> Checkstyle active for this project
- Open the file META-INF/MANIFEST.MF -> Dependencies tab
Add the plugins dethe Options group and click Finish. - If Eclipse asks you whether the Plug-in Development perspective should be opened, choose either Yes or No. It doesn't make much of a difference anyway.
You should now commit your new, empty project to the Git repository. We will do that from within Eclipse.
- Right-click your project in the Package Explorer and click Team > Share Project...
- As the repository type, select Git and click Next.
- Tell Eclipse what repository to add the project to. The repository you placed the project in is already preselected. Simply click Finish.
- Since Git support is now enabled for the project, right-click it again and click Team > Commit...
- Select all files, enter a (meaningful) commit message, and click Commit.
Writing the Layout Algorithm
When writing our layout algorithm, we are going to need to be able to access code defined in several other plug-ins. To do that, we need to add dependencies to those plug-ins:
- In your new plug-in, open the file
META-INF/MANIFEST.MF. The plug-in manifest editor will open. Open its Dependencies tab. - Add dependencies to the following plug-ins:
de.cau.cs.kieler.corede.cau.cs.kieler.core.core and dekgraphde.cau.cs.kieler.kiml.layout to the list of dependencies, then save the file
- Package: de
- Save the editor.
Layout algorithms interface with KIML by means of a layout provider class that has to be created and registered with KIML.
- Right-click the source folder of your plug-in and click New > Class.
- Set the package to
de.cau.cs.rtprak.<login>.exercise1 - Name: <Login>LayoutProvider Superclass: de
- You should now see a checkstyle warning for the doLayout method
- Add the keyword final to each method argument to eliminate the warning
Add the following constant to the class: as the superclass. (This will only be available through the Browse dialog if you have saved the plug-in manifest editor; if you haven't, Eclipse won't know about the new dependencies yet.) - Select Generate comments and click Finish.
login_name.tutorial2, enter Login_nameLayoutProvider as the class name, and select de.cau.cs.kieler.kiml.AbstractLayoutProviderImplement the layout provider classImplement the layout provider class:
Add the following constants:
Code Block language java /** default value for spacing between nodes. */
private static final float DEFAULT_SPACING = 15.0f;
- Write
Use the following
lines atcode as the
beginningskeleton of
the doLayout method (see IKielerProgressMonitor and KimlLayoutUtil):the
doLayout(...)method:
<Login>Code Block language java progressMonitor.begin("
LayouterLogin_name
layouter", 1);
layoutNodeKShapeLayout parentLayout =
parentNode.getData(KShapeLayout.class);
float objectSpacing = parentLayout.getProperty(LayoutOptions.SPACING);
if (objectSpacing < 0) {
}objectSpacing = DEFAULT_SPACING;
}

float borderSpacing = parentLayout.getProperty(LayoutOptions.BORDER_SPACING);
if (borderSpacing < 0) {
} Write the following line at the end of the doLayout method:borderSpacing = DEFAULT_SPACING;
Implement the rest of the layouter such that the nodes of the input graph are all put in a row} // TODO: Insert actual layout code. progressMonitor.done();
- See the KGraph and KLayoutData data structures: the input is a KNode and holds the nodes of the graph in its list of children Iterate over the nodes in the getChildren() list of the layoutNode input
- It is now time to write the code that places the nodes.Your code should place them next to each other in a row, as seen in the screenshot at the beginning of the tutorial.
| Info | ||
|---|---|---|
| ||
The following tips might come in handy...
|
...
|
...
|
...
|
...
|
...
|
...
...
|
...
|
...
|
...
|
...
|
...
|
...
|
Before you can test your layout code, you will have to register your new layout provider with KIML.
- Open the
META-INF/MANIFEST.MF -> Extensions tabMFfile again and switch to the Extensions tab. - Add an extension for defor
de.cau.cs.kieler.kiml.layout.layoutProviders. - Right-click the extension -> New -> layoutProviderSet name to <Login> Test Layouter, class to de.cau.cs.rtprak.<login>.exercise1.<Login>LayoutProviderand click New > layoutAlgorithm.
- Set the name to
Login_name Test Layouterand the class to your layout provider class name. - Right-click the new layoutProvider -> New -> knownOption, set option to denew layoutAlgorithm and click New > knownOption. Set option to
de.cau.cs.kieler.layout.optionsspacing.minSpacing - Add another knownOption, set to deanother knownOption for
de.cau.cs.kieler.borderSpacing. - Save the editor.layout.options.borderSpacingRun -> Run
We will now have to add a new run configuration that will start an Eclipse instance with your layout code loaded into the application, ready to be used.
- Click Run > Debug Configurations... -> right-click Eclipse Application -> New
- Name: Layout
- For testing the layouter, a new workspace location will be created; you may configure its destination in Workspace Data -> Location
- Add the program arguments -debug -consoleLog in the Arguments tab Go to Plug-ins tab, select Launch with:
- Right-click Eclipse Application and click New. Set the configuration's name to
Layout Test. - In the Arguments tab, make sure the the program arguments include
-debugand-consoleLog. - On the Plug-ins tab, set Launch with to plug-ins selected below only. Click Deselect All, activate Workspace checkbox, check the Workspace item in the tree, and click Add Required Plug-ins, Apply, Run.
- Click Apply to save your changes and then Debug to start an Eclipse instance to test with.
Test the layouter in
...
your new Eclipse instance:
- Click New -> > Project... -> General -> Project, name test > General > Project and set the project name to something like
Test. - Right-click test project -> New -> Other... -> Graphs Diagram
- Create a graph using the palette on the right
- Window -> Show View -> Other... -> KIELER -> Layout
- While the graph diagram is open, set Layout Provider or Type in the Layout view to <Login> Test Layouter
- Open the additional views Layout Graph and Layout Time Trigger layout with KIELER -> Layout or the new project and click New > Empty KEG Graph. Enter a meaningful name and click Finish.
- Put a few nodes into the diagram. To properly test your code, you will want to vary the sizes of the nodes. It may also be a good idea to get into the habit of giving each node a different name, such as N1, N2, etc. This will help you later if you have to debug your algorithm.
- Open the Layout view through Window > Show View > Other... > KIELER Layout > Layout.
- With your KEG diagram selected, set the Layout Algorithm option in the Layout view to your new algorithm.
- Save your KEG diagram.
- Trigger automatic layout by clicking the layout button in the toolbar, or by hitting Ctrl+R L (first Ctrl+R, then L) or the button in the toolbarSee the direct input and .
| Info | ||
|---|---|---|
| ||
You can see the direct output of your algorithm |
...
and the time it took to run it through the Layout Graph and Layout Time views. The views are available through the |
...
|
Once you're satisfied with your node placement code, it's time to take care of edge routing.
Add a new method that will implement the edge routing using the following skeleton code:
nodeCode Block language java /** * Routes the edges connecting the nodes in the given
parentgraph. * * @param parentNode the
nodegraph
ofwhose
the input graphedges
/to route. *
public@param yStart y
voidcoordinate
routeEdges(finalof
KNodethe
parentNode)start
{of
getMonitor().begin("Edge Routing", 1); getMonitor().done(); }the edge
- Add the following code to the end of the doLayout method in your layout provider:
        EdgeRouter edgeRouter = new EdgeRouter();
        edgeRouter.reset(progressMonitor.subTask(1));
        edgeRouter.routeEdges(layoutNode);
Implement the routeEdges method - Add a call to
routeEdges(...)in yourdoLayout(...)method and implement the latter.
routing area.
 * @param objectSpacing the object spacing.
 * @return height used for edge routing.
 */
private float routeEdges(final KNode parentNode, final float yStart, final float objectSpacing) {
    // TODO: Implement edge routing

    return 0;
} |
| Info | ||
|---|---|---|
| ||
Here's a few tips for implementing the edge routing:
|
...
|
...
|
...
|
...
|
...
|
...
|
...
|
...
|
...
|
...
|
...
|
...
|
...
|
...
|
...
|
...
|
...
|
...
|
...
|
...
|
...
|
...
|
Once you're done implementing the edge routing code, test it by running your debug configuration again, as before.
Before You Run Away...
...don't forget to commit your layout algorithm to your repository, and to push your commits to the tutorial repository on our server. If it's not there, we won't be able to see your work! ![]()