Prom - Project Management in KIELER
Deprecated since 0.13
This article is deprecated. The described features are no longer available in current releases.
Project are now build using an incremental project builder.
Please see the new Project Management (Prom)
Topics
Overview
The KIELER Compiler (KiCo) can generate different code targets from models. For example it is possible to generate C and Java code from an SCT file. As a result KIELER has to integrate with existing development tools and practices for the C and Java world. In the context of embedded systems, the target device also varies heavily.
Therefore the KIELER Project Management (Prom) has been developed. It eases the creation, compilation and deployment of projects, when using models that can be compiled via KiCo (e.g. SCCharts, Esterel). Furthermore it eases the creation of wrapper code, which is used to initialize and run the model. To do so, there are mainly three components: An Eclipse Launch Configuration, so called Environments, and Project Wizards, which will be introduced in the following.
The KiCo Launch Configuration
Prom provides a launch configuration (launch config) to
- compile code from models via KiCo
- at the same time, generate wrapper code for these model files
- afterwards run an associated launch configuration (e.g. for a Java Application) and
- execute arbitrary shell commands sequentially if the KiCo compilation and wrapper code generation finished successfully
KiCo launch configurations work per project basis so that every project has to create its own launch config. This is done automatically when performing Right Click > Run As > KiCo Compilation on a model file.
The Run As command will search for a KiCo launch config for the project. If there is such a config, the selected file is only added to the list of model files that should be compiled. If there is none, a launch config is created by using the main file and environment the project has been created with. If the main file and environment information could not be found, dialogs will query it from the user.
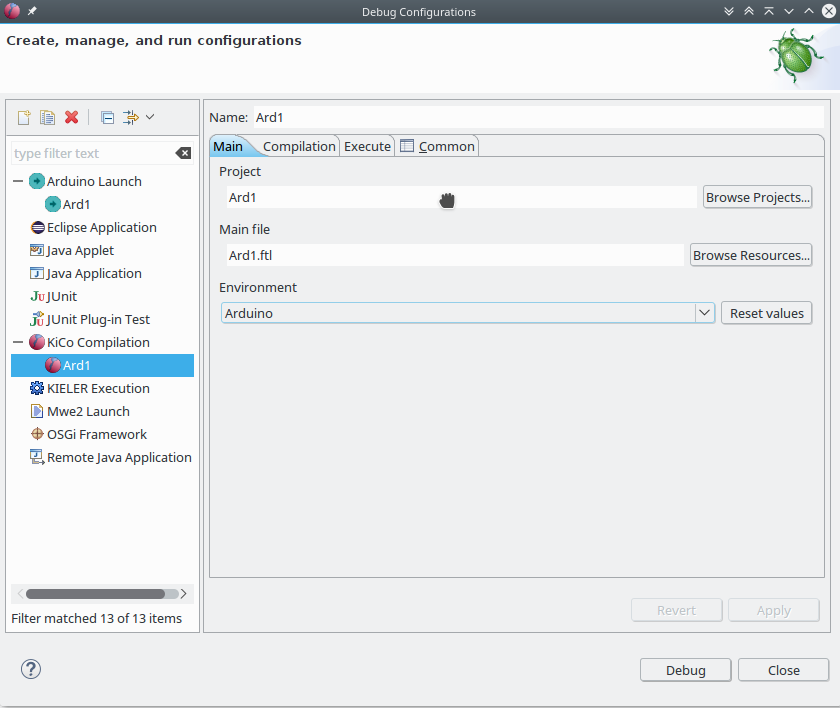
A main file typically contains the entry point of the program on the target environment. Its wrapper code initializes and runs the model and sets inputs and outputs to the physical components of the target device. The main file of the launch config is used to set several file path variables, which can be used in several fields of the configuration, notably the shell commands to be executed, and wrapper code input. To use a variable, the syntax is ${variable_name}. The variables that are set are
- main_name : The file name, including its file extension (e.g. MyModel.sct)
- main_path : The project relative path (e.g. src/MyModel.sct)
- main_loc : The absolute file system path (e.g. /home/me/workspace/MyProject/src/MyModel.sct)
- main_name_no_ext : The file name without its file extension (e.g. MyModel)
Further, similar variables for the compiled main file are set, which is the main file in the directory of kieler generated files (see below)
- compiled_main_name : The file name, including its file extension (e.g. MyModel.java)
- compiled_main_path : The project relative path (e.g. kieler-gen/MyModel.java)
- compiled_main_loc : The absolute file system path (e.g. /home/me/workspace/MyProject/kieler-gen/MyModel.java)
- compiled_main_name_no_ext : The file name without its file extension (e.g. MyModel)

The values of the launch config can also be (re)set to an environment. This will revert the fields for the compilation target, wrapper code generation and command execution.
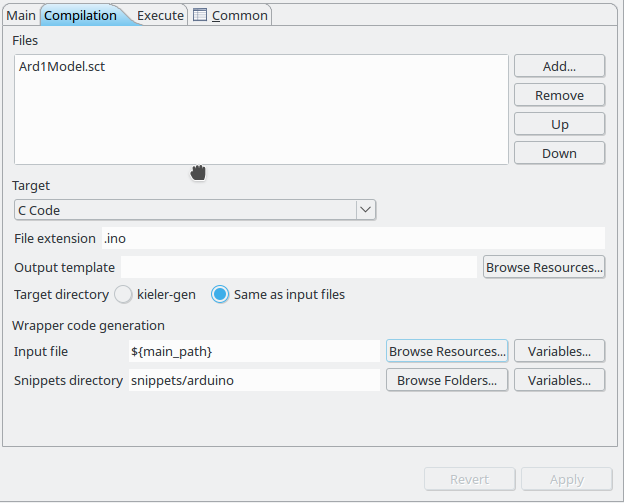
The compilation via KiCo is configured on the Compilation tab. Here you can add/remove files that should be compiled via KiCo and the target language as well as the file extension for the language (such as .java for Java). The files will be compiled sequentially in order of appearance in the list. Further, it is possible to add a file path to a template for the output. This is useful to add surrounding content to the KiCo output. The placeholder ${kico_code} can be used in the template.
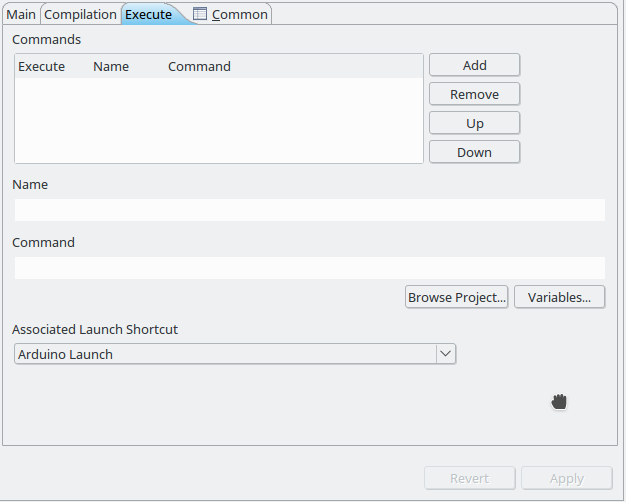
On the Execute tab, a list of shell commands can be added. They are typically used to further compile the KiCo and wrapper code output and afterwards deploy the result to the target platform. The commands are executed sequentially in order as they appear in the list, after the KiCo compilation and wrapper code generation finished successfully. If a command fails (returns a non-zero exit code), following commands will not be excuted. The name of commands have to be unique and must not contain a comma.
The standard streams of executed shell commands (stdin, stderr, stdout), as well as errors from the KiCo compilation and wrapper code generation, are printed to the Console View.

Launch Groups
The list of shell commands are a simple mechanism to further compile and deploy code via command line tools. However, there are cases in which command line tools are not available or reasonable to use, for example because a different Eclipse launch configuration does a better job.
In this case it is desirable that the KiCo launch config only compiles the model and another Eclipse launch config does the rest. This can be achieved via launch groups. They let you define a launch configuration, which starts other launch configurations sequentially. To illustrate this, another use-case for launch groups is that you have a Client-Server application and want to start the client right after the server for debugging. Then you can create a launch config for the server and a launch config for the client. Afterwards you create a launch group with aforesaid configurations.

Launch groups are a part of the C/C++ Development Tools (CDT), although they provide a general mechanism that could be a part of any Eclipse IDE. The CDT is available in the Eclipse Marketplace (Help > Eclipse Marketplace)
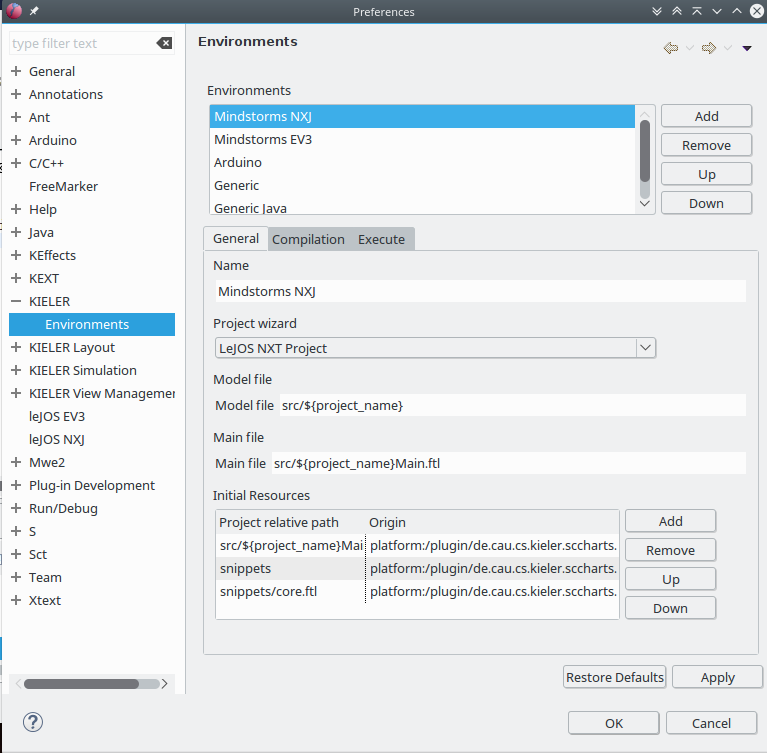
Prom Environments
Environments are used to provide default settings for project creation and launch. They are configured in the preferences (Window > Preferences > KIELER > Execution Environments).
An environment consists of
- a unique name, which may not contain a comma
- an associated project wizard
- the path of the default model file for the project
- the path of the default main file for the project
- information about folders and files that should be imported at project setup
- default values for the KiCo compilation
Besides the name, all of these are optional, but can improve the workflow.
The associated project wizard is run as part of the Prom project wizard and takes care of the actual project creation. Afterwards the model file is created and finally other folders and files are imported.
The default values for the KiCo compilation are used to compile model files in the project.
Paths for imported resources
To import a resource (folder or file), its project relative path has to be specified. The resource will be created at this location in the project.
Furthermore, it is possible to specify initial content for these resources. This is done in the field origin. Without an origin specifed, an empty resource will be created.
To specify intial content for a file, the origin has to be an absolute file path or an URI with the platform scheme of Eclipse. Such an URI has the form plaftorm:/plugin/a.plugin.name/folder/in/the/plugin/file.txt
Specifying intial content for a folder is analog. Its origin has to be an absolute directory path or an URI in the form plaftorm:/plugin/a.plugin.name/folder/in/the/plugin
Project Wizards with Prom
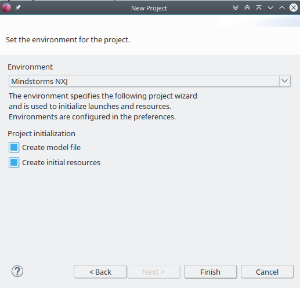
Prom provides project wizards, which can create and initialize a project with a model file, and imported resources. The wizards for different model file types (e.g. SCChart project vs Esterel project) differ only in the initial content for the model file. Other initial content is choosen from the environment, which is selected on the first page of a Prom wizard. The project creation itself is done by another wizard, that is started from within the Prom wizard.
For example to create a project to develop Minstorms running leJOS, one can choose the SCCharts project wizard. In this wizard, one can choose the Mindstorms NXT environment and define what will be initialized in the project (model file, initial resources). Now, when pressing the finish button, the associated project wizard from the leJOS plugin will be started. When it finishes, the newly created project is initialized with a model file and the defined resources.
Wrapper Code Generation
When modeling a program for an embedded system, it is necessary to set inputs and outputs of physical components (sensors/actuators) to inputs and outputs of the model. This is typically done using wrapper code. However, wrapper code is often similar for a specific device and programming language.
Therefore one can write wrapper code snippets for a target device. These can then be injected to a template file as part of a KiCo launch. What snippets are injected is defined using annotations on inputs and outputs directly in the model file.
In SCT files, annotations are added as in java, with an at-sign e.g. @Wrapper Clock, "500". You can write implicit and explicit wrapper code annotations.
Explicit annotations have the form @Wrapper SnippetName, arg1, arg2, ..., argN. An explicit wrapper annotation raises an error if the snippet does not exist, thus it is recommened to use the explicit @Wrapper annotation. Every other annotation is tried as wrapper code annotation as well, but will be ignored, if no such snippet could be found. Thus you can write the above explicit annotation as @SnippetName arg1, arg2, ..., argN, but there will be no error if the snippet with this name does not exist or could not be found, for example because of a typo.
Note: Annotation names and parameters are case sensitive. That means that Clock, clock, Floodlight, FloodLight are all different annotations.

In the template file one can use special placeholders.
${file_name} is replaced with the name withouth extension of the file that is generated (e.g. Main.java will be Main).
${model_name} is replaced with the name of the last compiled model.
${declarations} and ${decls} will be replaced with additional declarations of variables and functions (<@decl>...</@decl> of a snippet definition). Declarations should occur before the tick loop of the model file. In general they are not required for Java code but may be useful in C applications (e.g. for extern calls).
${initializations} and ${inits} will be replaced with initialization code for components (<@init>...</@init> of a snippet definition). Initialization should occur before the tick loop of the model file.
${inputs} will be replaced with code to set inputs for the model (<@input>...</@input> of a snippet definition). Setting model inputs should occur in the tick loop, before the tick function call.
${outputs} will be replaced with code to read outputs of the model. (<@output>...</@output> of a snippet definition). Reading outputs of the model should occur in the tick loop, after the tick function call.
${releases} will be replaced with code to free allocated resources. (<@release>...</@release> of a snippet definition). Releasing resources should occur after the tick loop at the end of the program.

To ease the modification of the template file, one can open it with the text editor the final code will be for. This will enable syntax highlighting and code completion for the langauge, but it will not show any errors. You can open the file for example with the Java Editor of Eclipse using Right Click > Open With > Other > Java Editor
FreeMarker
The wrapper code injection is done using the open source template engine FreeMarker. A wrapper code snippet is basically a Macro definition of FreeMarker. The Macro is called when the corresponding annotation is found in the model file. The file extension of FreeMarker templates is .ftl.
There is an Eclipse plugin for FreeMarker as part of the JBoss Tools Project. It can be installed using the Eclipse Marketplace.

Automatically generated files
Files created by Prom are either saved in the directory kieler-gen or in the same directory as the input files they correspond to. This is configured in the KiCo launch configuration.
When choosing the kieler-gen folder, the directory structure of input files is retained. However a starting Java source folder will be skipped because kieler-gen itself is a Java source folder.
For example
- if code is not a Java source folder, the file code/subfolder/MyModel.sct will be save to kieler-gen/code/subfolder/MyModel.sct.
- if src is a Java source folder, the file src/subfolder/MyModel.sct, will be saved to kieler-gen/subfolder/MyModel.sct.
Overview
Content Tools