Page History
...
Several open-source, third-party replacements for the offical Lego firmware have been developed. These support many well known programming languages, such as Java, C/C++, Python, Lua, etc. In the following we will use KIELER SCCharts to program Mindstorms running the Lego Java Operating System (leJOS). Therefore we will first install leJOS NXJ and flash its firmware. Afterwards we will create a simple SCCharts project in KIELER that we will compile and deploy to the NXT brick.
If you want to learn the SCCharts langugage first, you can follow these links:
...
Download and install leJOS
...
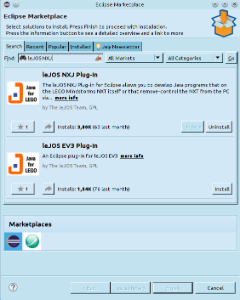
If you have an NXT brick, install the leJOS NXJ Plug-in. If you have an EV3 brick, install the leJOS EV3 plugin.
After 
Tip: To speed up the installation, the plugin requires a little configuration. Go to Window > uncheck the option "Contact all update sites during install to find required software". This will reduce the installation time from drastically (around 30 seconds instead 10 minutes).
After the installation, the plugin requires a little configuration. Go to Window > Preferences > leJOS NXJ (Window > Preferences > leJOS EV3 respectively) and enter the base directory of your leJOS installation in the NXJ_HOME field.
...
- Choose File > New > Project > KIELER SCCharts > SCCharts Project
- In the project creation wizard that opens, select Mindstorms NXJ or Mindstorms EV3 (depending on your brick) as environment and hit finish
- The project wizard from the leJOS plugin opens. Set the project name to Flashlight and click finish.
- The project is created and the model file is opened in an editor (This might take a few seconds).
Edit the
...
Model:
Change the contents of the model file to the following code and save it.
...
The available wrapper code snippets are defined in the snippets directory of the project the directory assets/snippets in ftl files (FreeMarker template files). The table below gives an overview of the available wrapper code snippets.
...
Note: To view ftl files with highlighting, you may want to install the FreeMarker IDE feature from the JBoss Tools. However, this is not necessary to work with KIELER. JBoss Tools is available in the Eclipse Market Place and via update site. The update site for Eclipse Luna is stable releases is http://download.jboss.org/jbosstools/updatesneon/stable/lunaupdates/ . Note that only the FreeMarker IDE feature is required (Abridged JBoss Tools > FreeMarker IDE).
...
Build the
...
Project:
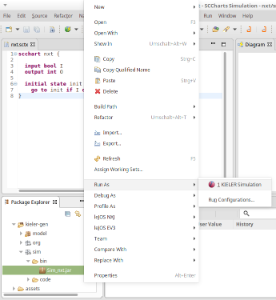
With the mouse over the SCT file in the project explorer, perform Right Click > Run As > KiCo Compilation.
A launch config is created, which compiles the model to Java code and creates wrapper code from the annotations in the model file. Afterwards this output is compiled and deployed to the Mindstorms brick, by using the launch shortcut from the leJOS plugin. If any errors occur, you can see them in the Console View.
For a deeper understanding of the project launch and initialization, take a look at the wiki page for Prom.
Available Wrapper Code Snippets
There are several wrapper code snippets that can be used as annotations on input and output variables in the model file. These snippets are inserted in the main file template as part of the project launch. The available snippets are listed below.
For sensors, the port has to be on of S1, S2, S3, S4.
For motors / actuators the port has to be one of A, B, C, D.
...
Resets a clock, such that the full time intervall of the clock has to elapse, before the clock will be set to true again.
If autoFalse is true, the reset variable will be set to false automatically.
...
Delays the execution until the tick loop takes at least as long as the given target duration.
The input variable is set to the actual tick loop duration.
...
The model is now ready to be compiled. Compilation is done in the background when the project is built. There are two ways to build a project: manually using Project > Build Project, or automatically via Project > Build Automatically. If the automatic build is enabled, resources are built when they are saved.
Building the project will create a new folder kieler-gen in which all results are saved. This includes the compiled code from the model, an executable simulation for the model and wrapper code that is ready to be deployed to the Mindstorms Brick.
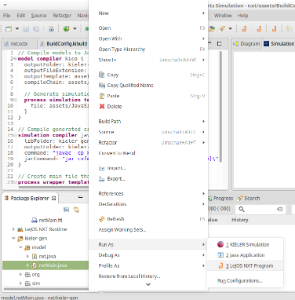
The simulation is saved as JAR file in kieler-gen/sim/bin and can be started via Right Click > Run as > KIELER Simulation. Models and variables of a running simulation are displayed in the Data Pool View.
Besides the simulation, the finished wrapper code that can be uploaded to the Mindstorms brick is created as part of the project build. It is saved in kieler-gen/model. To upload it to the Mindstorms brick, use Right Click > Run as > leJOS NXT Program.
Excluding the Simulation from the NXT Build
It is necessary to exclude the simulation directory and org.json directory inside kieler-gen from the NXT project specific build via Right Click > Build Path > Exclude. Afterwards the project has to be build again to remove all error markers in these directories.
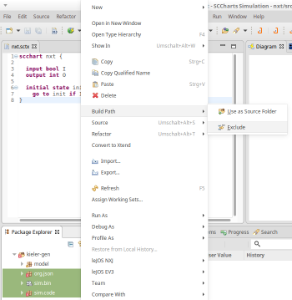
Normally the NXT project attempts to compile all Java files in the kieler-gen directory for the platform. However, the simulation that is generated is not targeted at the Mindstorms brick and has compilation errors. It is compiled separately by KIELER.
Available Wrapper Code Snippets
There are several wrapper code snippets that can be used as annotations on input and output variables in the model file. These snippets are inserted in the main file template as part of the project build. The available snippets are listed below.
For sensors, the port has to be on of S1, S2, S3, S4.
For motors / actuators the port has to be one of A, B, C, D.
| Snippet Name and Parameters | Description | Use on | Variable type | Remark | Defined in File |
|---|---|---|---|---|---|
| Clock, milliseconds | Sets a variable to true for one tick if the time in milliseconds passed since the last time it was set to true. | input | bool | See also ResetClock. | timing.ftl |
| ResetClock, clockVariableName, autoFalse | Resets a clock, such that the full time intervall of the clock has to elapse, before the clock will be set to true again. If autoFalse is true, the reset variable will be set to false automatically. | output | bool | autoFalse is true per default. | timing.ftl |
| Time | Reads the elapsed time since program start (milliseconds) | input | int | timing.ftl | |
| TickLoopDuration, targetInMilliseconds | Delays the execution until the tick loop takes at least as long as the given target duration. The input variable is set to the actual tick loop duration. | input | int | Should be used on the very first input variable in the model, such that waiting is the last action in the tick loop. In case the actual tick loop duration is longer than the target duration, the modeler can provide some error handling. | timing.ftl |
| TickWakeUp | Sets the input variable to the current system time (milliseconds). The model can add to this variable to get a new value. This is the next system time the tick function will be called. In other words, the next tick function call is delayed until the wake up time has been reached. For instance the statement nextTickWakeUp += 500 could be used to call the tick function again in 500 milliseconds, if nextTickWakeUp is an input with the corresponding annotation. | input | int | Should be used on the very last input variable in the model, such that waiting and settings the system time is the last action done, before the tick function call. | timing.ftl |
| TickCount | Counts the ticks. First tick is 0, the following are 1, 2, 3, ... | input | int | timing.ftl | |
| Sleep | Lets the current thread sleep the time in milliseconds of the variable value. | output | int |
| timing.ftl | |||||
| Print, autoReset | Prints a string variable if the string is not empty. If autoReset is true then the string variable is set to the empty string after it has been printed | output | string | autoReset is true per default. | print.ftl |
| DrawString, x, y | Prints a string to the given x and y coordinate on the LCD. | output | string |
| print.ftl | |||||
| Button, buttonId | Sets a variable to true iff the button on the Mindstorms device is pressed. | input | bool | The buttonId has to be one of ENTER, LEFT, RIGHT | touch_and_buttons.ftl |
| TouchSensor, port | Sets a variable to true iff the touch sensor on the given port is pressed. | input | bool |
| touch_and_buttons.ftl | |||||
| LightSensor, port, percentValue | Reads the value of a light sensor. If percentValue is true, the a percent value is retured, based on the light sensor calibration. | input | int | percentValue is not available on EV3 | light.ftl |
| CalibrateLightSensor, port, signal | Calibrates a light sensors high or low values. This means if the variable is true, the current value of the light sensor is taken as its reference high / low value. | output | bool | signal has to be one of High, Low | light.ftl |
| Floodlight, port | Reads / Sets the state of the red lamp of the light sensor. | input output | bool |
| light.ftl | |||
| RCXLamp, port | Turns an RCX lamp on (variable is true) or off (variable is false) | output | bool |
| light.ftl | |||||
| MotorSpeed, port, brake | Reads / Sets the speed of the motor in degrees per minute. If the speed value is negative, the motor will drive backwards. If the speed is zero, the motor will actively brake until it stops (brake is true) or remove all power and rollout (brake is false). | input output | int | brake is true per default. | motor.ftl |
| MotorIsMoving, port | Sets a variable to true iff the motor on the given port is moving. | input | bool |
| motor.ftl | |||
| MotorRotation, port | Lets a motor rotate the variable value in degrees. This is only done if the value is unequal zero. If the value is negative, the motor rotates backwards. The variable is set to zero afterwards, such that setting the variable once to a value X, will let the motor rotate X degrees. | output | int |
| motor.ftl | |||||
| Beep, volume | Plays a beep sound as long as the variable is true. | output | bool | default volume is 10 | sound.ftl |
| Buzz, volume | Plays a buzz sound as long as the variable is true. | output | bool | default volume is 10 | sound.ftl |
| BeepSequence, direction, volume | Plays a sequence of tones in either ascending or descending tone frequency if the variable is true. The variable is set to false automatically. | output | bool | direction has to be one of Up, Down default volume is 10 | sound.ftl |
| UltrasonicSensor, port | Reads the distance that an ultrasonic sensor measures. | input | int |
| ultrasonic.ftl | |||||
| Gyro, port, mode | Reads the value of a gyroscope. | input | int | Not available on NXT mode hat to be one of Angle, Rate | gyro.ftl |
| CalibrateGyro, port, autoReset | Resets a gyroscope if the variable is true. If autoReset is true, the variable is set to false automatically. | output | bool | autoReset is true per default | gyro.ftl |
...
...
Using the Remote Console (RConsole)
...
The following presents typical issues and how to solve them.
| Issue | Typical Error Messages | Description | Solution |
|---|---|---|---|
| leJOS EV3 does not support Java 8 | "java.lang.UnsupportedClassVersionError" "unsupported major.minor version" | You compile the sources in your project with Java 8 and upload them to the brick. However the lejos EV3 does not support Java 8 | Go to the project properties and switch to Java 7 (Right Click on project > Properties > Java Compiler > Compiler compliance level) |
| Uploading to the brick does not respond |
| You compile a file successfully and when uploading the result, the connected brick is found. Anyway the upload does not terminate and does not react. | Flash the brick with the current leJOS firmware. If the brick is recognized correctly and the attempt to upload a compiled file fails then the firmware on the brick might be outdated. | ||
| Compilation and uploading works from command line but not when using KIELER | This Java instance does not support a 32-bit JVM. Please install the desired version. | You can compile and upload code to the brick using the command line tools but when using KIELER an error message apprears because Java does not support 32-bit JVM. | Set the LEJOS_NXT_JAVA_HOME environment variable, such that it points to an 32-bit JDK and is visible for GUI applications (or at least KIELER). The process to do so differs on every OS. As alternative, execute KIELER from terminal. |
| Brick does nothing after program finished and prints "Program exit" |
| A program was uploaded and finished without errors. Afterwards the brick prints "Program exit" but does not open the main menu. | This is normal behaviour if uploading a program in debug mode instead run mode (Debug As instead Run As in Eclipse). To get back to the main menu, press the ENTER and ESCAPE button of the brick at the same time. |
...
Overview
Content Tools