Program LEGO Mindstorms with leJOS and SCCharts
Overview
Mindstorms is a product family from Lego, with sensors, motors and a programmable brick. The newest iteration of the product family is the EV3 programmable brick. Its predecessors are NXT and RCX. In the following we will see how to develop applications for the NXT brick.
Several open-source, third-party replacements for the offical Lego firmware have been developed. These support many well known programming languages, such as Java, C/C++, Python, Lua, etc. In the following we will use KIELER SCCharts to program Mindstorms running the Lego Java Operating System (leJOS). Therefore we will first install leJOS NXJ and flash its firmware. Afterwards we will create a simple SCCharts project in KIELER that we will compile and deploy to the NXT brick.
Download and install leJOS
Download and extract the newest archives for your Operating System from Sourceforce (Linux/Mac) or use the Setup.exe (Windows).
The further installation is explained in detail at http://www.lejos.org/nxt/nxj/tutorial/Preliminaries/GettingStarted.htm.
Known issues
Linux
On Linux there is an issue when uploading the firmware because of a kernel module (http://ubuntuforums.org/showthread.php?t=1123633). If you can't upload the firmware with your Linux OS, add blacklist cdc_acm at the very end of the file /etc/modprobe.d/blacklist.conf. Afterwards execute sudo rmmod cdc_acm. This will remove the cdc_acm module from the kernel and prevent its restart. Now try to flash the firmware again.
Another issue is that the development package of libusb has to be installed. On Ubuntu you can do this by using sudo apt-get install libusb-dev.
Furthermore, to use USB connection, a java library has to be compiled via ant. To do this perform cd /path/to/leJOS/build and start ant. If the ant build tool is not installed on your system, you can do so via sudo apt-get install ant.
Test the Mindstorm
A simple Hello World application for the Mindstorms is developed as part of the leJOS tutorial http://www.lejos.org/nxt/nxj/tutorial/Preliminaries/FirstProgram.htm
If this works with your device, you are able to start using KIELER to develop applications for the NXT brick.
The Eclipse plugin for leJOS
There is an Eclipse plugin for leJOS which adds a project creation wizard and launch configuration to the platform.
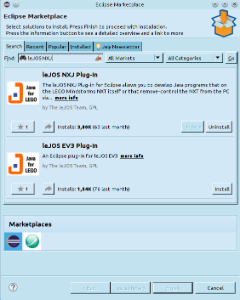
- You have to install it via the Eclipse Marketplace (Help > Eclipse Marketplace...).
OR - Install the plugin manually (Help > Install new Software...). Use the following update site: http://www.lejos.org/tools/eclipse/plugin/ev3/
If you have an NXT brick, install the leJOS NXJ Plug-in. If you have an EV3 brick, install the leJOS EV3 plugin.
After the installation, the plugin requires a little configuration. Go to Window > Preferences > leJOS NXJ and enter the base directory of your leJOS installation in the NXJ_HOME field.
For the EV3 plugin, the required dialog is under Window > Preferences > leJOS EV3. You have to set the leJOS installation directory. Furthermore the leJOS EV3 plugin requires the IP address to connect to the brick (it may work without, but its safer to directly set the name. Reduces headache ![]() ). Check Connect to named brick and enter the IP adress of the brick (displayed on the brick at startup).
). Check Connect to named brick and enter the IP adress of the brick (displayed on the brick at startup).
Creating an Example Project
The following shows how to create a project, that will turn on a light if a button is pressed.
Create a new project:
- Choose File > New > Project > KIELER SCCharts > SCCharts Project
- In the project creation wizard that opens, select Mindstorms NXJ or Mindstorms EV3 (depending on your brick) as environment and hit finish
- The project wizard from the leJOS plugin opens. Set the project name to Flashlight and click finish.
- The project is created and the model file is opened in an editor (This might take a few seconds).
Edit the model:
Change the contents of the model file to the following code and save it.
Floodlight.sct
scchart Flashlight {

    @Wrapper TouchSensor, S4
    input bool button;

    @Wrapper Floodlight, S1
    output bool light;

    initial state lightOff
    --> lightOn with button / light = true;

    state lightOn
    --> lightOff with !button / light = false;
}
This model will start in the state lightOff. If the button is pressed, it will turn on the light and change to the corresponding state, where the light is turned off, as soon as the button is not pressed anymore.
The annotations on the input and output variable are used to define which wrapper code is used to set / read them. @Wrapper TouchSensor, S4 will set the input variable to true iff the touch sensor on the port S4 is pressed. @Wrapper Floodlight, S1 on the output variable will turn on the red led of the light sensor that is attatched to port S1 iff the variable is true.
The available wrapper code snippets are defined in the snippets directory of the project in ftl files (FreeMarker template files). (To view ftl files with highlighting, you may want to install the FreeMarker IDE feature from the JBoss tools that is available in the Eclipse Market Place.)
Note: The Floodlight of the EV3 has a pretty high latency when switching between on and off.
Launch the project:
With the mouse over the SCT file in the project explorer, perform Right Click > Run As > KiCo Compilation.
A launch config is created, which compiles the model to Java code and creates wrapper code from the annotations in the model file. Afterwards this output is compiled and deployed to the Mindstorms brick, by using the launch shortcut from the leJOS plugin. If any errors occur, you can see them in the Console View.
For a deeper understanding of the project launch and initialization, take a look at the wiki page for Prom.
Using the Remote Console (RConsole)
The display of the NXT brick is rather small compared to a Monitor. To ease debugging, one can print to a Remote Console (RConsole), if the USB cable is connected. This enables easier collection for example of sensor data.
To use the RConsole, uncomment the RConsole lines in the wrapper code template Main.ftl. Start the nxjconsoleviewer tool in the bin directory of your leJOS installation. Now, when starting the application, the brick tries to connect with the nxjconsoleviewer. Press the Connect button. If connected succesfully, RConsole.println(...) commands will be written to this window.
The EV3 brick has a similar feature. However it does not require any code changes. Just run the ev3console program in the bin directory of your leJOS installation from command line. The output of the brick will be printed to this command line.
Problem Solving
The following presents typical issues and how to solve them.
| Issue | Typical Error Messages | Description | Solution |
|---|---|---|---|
| leJOS EV3 does not support Java 8 | "java.lang.UnsupportedClassVersionError" "unsupported major.minor version" | You compile the sources in your project with Java 8 and upload them to the brick. However the lejos EV3 does not support Java 8 | Go to the project properties and switch to Java 7 (Right Click on project > Properties > Java Compiler > Compiler compliance level) |
Overview
Content Tools